Anaconda虚拟环境离线迁移

项目中遇到需要在离线环境下为anaconda安装python 3.8虚拟环境的问题,即服务器不能连接互联网的环境,这里记录一下解决方法。

一、环境信息

> uname -a
Linux taos-1 3.10.0-1160.el7.x86_64 #1 SMP Mon Oct 19 16:18:59 UTC 2020 x86_64 x86_64 x86_64 GNU/Linux

> conda --version
conda 4.5.4

二、在线安装虚拟环境

先找一台在线的服务器,安装anaconda所需的虚拟环境,我这里虚拟环境是python 3.8加上pandasnumpymatplotlib等几个常用软件包。

> conda create -n python38 python=3.8
> conda install -n python38 pandas numpy matplotlib

三、备份虚拟环境

使用conda pack命令完整备份虚拟环境:

> conda install -c conda-pack
> conda pack -n python38 -o env_python38_pack.tar.gz

备份得到的是一个.tar.gz压缩包,如果查看压缩包里的内容,目录结构如下图所示:

file

四、离线恢复虚拟环境

离线恢复不需要conda-pack命令,只需要将打好的虚拟环境包复制到目标环境的临时目录,然后解压缩到anaconda的envs目录下即可:

> mkdir /root/anaconda3/envs/python38
> tar zxvf /tmp/env_python38_pack.tar.gz -C /root/anaconda3/envs/python38

输入conda info -e命令可以看到虚拟环境已经添加上了:

file

五、补充说明

1. 是否可以直接备份env下的目录?

一般不可以。网上有些文章提到可以直接备份envs/python38目录然后用下面的命令恢复:

> conda create -n [name] --clone [path] --offline

但经过测试当虚拟环境有依赖包时,离线恢复环境会失败,提示下面的错误,原因可能是虚拟环境的依赖包与目标环境pkgs目录下的包版本不同:

RuntimeError('EnforceUnusedAdapter called with url https://repo.anaconda.com/pkgs/main/linux-64/ca-certificates-2022.10.11-h06a4308_0.tar.bz2\nThis command is using a remote connection in offline mode.\n',)

file

观察源anaconda下的pkgs目录可以发现,conda install安装新的虚拟环境时有一些依赖包是安装在pkgs目录下的。那么如果备份时将pkgs目录也备份下来是否可以呢?我认为有以下缺点:

  1. pkgs目录比较大不方便网络传输(一般2GB~3GB);
  2. 恢复时需要处理envspkgs两个目录比较繁琐;
  3. 对目标环境的侵入性比较高,因为会覆盖pkgs下的一些文件。

如果只备份pkgs下的部分新安装的目录,比如按修改时间过滤,则可能遇到类似下面的错误:

FileNotFoundError: [Errno 2] No such file or directory: '/root/anaconda3/pkgs/libstdcxx-ng-11.2.0-h1234567_1/info/index.json'

2. 是否可以用conda export命令备份?

如果目标环境是在线的可以用conda export命令备份,然后用conda create -f恢复。但对离线的情况不适用。

> conda env export -n python38 > /tmp/python38.yml
> cat /tmp/python38.yml
name: python38
channels:
  - defaults
dependencies:
  - ca-certificates=2022.10.11=h06a4308_0
  - certifi=2022.9.24=py38h06a4308_0
  - ld_impl_linux-64=2.38=h1181459_1
  - libffi=3.3=he6710b0_2
  - libgcc-ng=11.2.0=h1234567_1
  - libstdcxx-ng=11.2.0=h1234567_1
  - ncurses=6.3=h5eee18b_3
  - openssl=1.1.1q=h7f8727e_0
  - pip=22.2.2=py38h06a4308_0
  - python=3.8.13=haa1d7c7_1
  - readline=8.2=h5eee18b_0
  - setuptools=65.5.0=py38h06a4308_0
  - sqlite=3.39.3=h5082296_0
  - tk=8.6.12=h1ccaba5_0
  - wheel=0.37.1=pyhd3eb1b0_0
  - xz=5.2.6=h5eee18b_0
  - zlib=1.2.13=h5eee18b_0
prefix: /disk1/anaconda3/envs/python38

# 恢复环境
> conda env create -f python38.yaml

综上,建议用conda pack命令备份anaconda的虚拟环境。

六、参考链接

https://www.anaconda.com/blog/moving-conda-environments
https://conda.github.io/conda-pack/
https://www.jianshu.com/p/adb927fa0091
https://blog.csdn.net/snowing118102/article/details/84319736
https://blog.csdn.net/CREATOR_Jay_xu/article/details/91971446

使用JMeter测试TDengine数据库性能

TDengine 是一款专为时序数据打造的国产数据库产品,它可对TB量级的时序数据进行存储、分析和分发,常备应用于设备运行状态实时监测和预警等场景。

在前面的文章中我们曾经介绍过使用sysbench进行过数据库性能测试,但sysbench聚焦于mysql和postgresql这两种关系数据库,对其他数据库的支持几乎为零(曾支持过oracle但后来取消了)。因此这里我们使用更通用的测试框架JMeter进行性能测试。

环境信息

TDengine服务器 TDengine驱动 jmeter
3.0.0 3.0.2 5.5

添加依赖

将连接TDengine所需的jar包复制到jmeter安装目录下的lib目录:

taos-jdbcdriver-3.0.2.jar
fastjson-1.2.29.jar

准备数据库

在TDengine数据库里预先创建用于测试的库和表:

create database if not exists test vgroups 10 buffer 10;

测试发现create table既可以创建stable也可以创建table,为避免歧义我们严格用create stable来创建超级表:

create stable test.stable01 (time timestamp, col001 double, col002 double, col003 double, \
    col004 double, col005 double, col006 double, col007 double, col008 double, col009 double, \
    col010 double) tags (device varchar(20));

创建子表:

create table test.table01 using stable01 tags ('device01');

测试计划

在GUI模式下创建测试计划(tdengine_test.jmx):
file

执行测试

执行测试(-n表示不启动GUI,-t参数指定测试计划文件,-l指定测试csv格式的结果文件,-e表示测试结束后生成html格式报告,-o表示指定报告的路径名):

jmeter -n -t tdengine_test.jmx -l log1.jtl -e -o report1

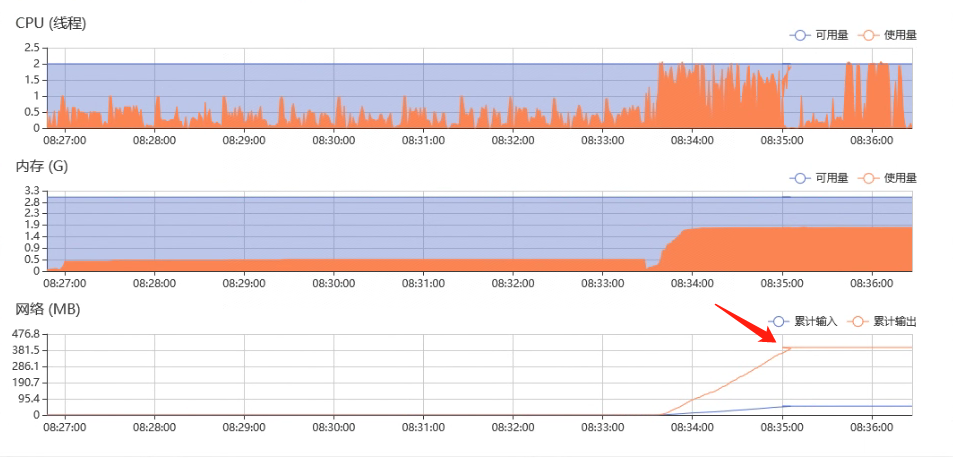
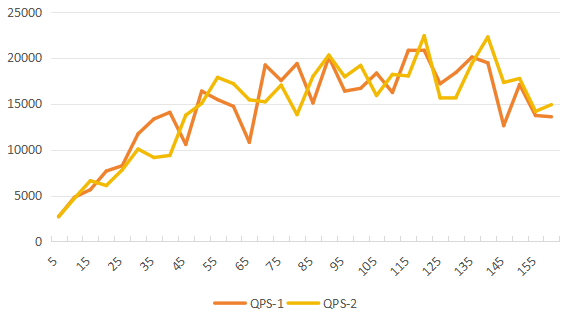
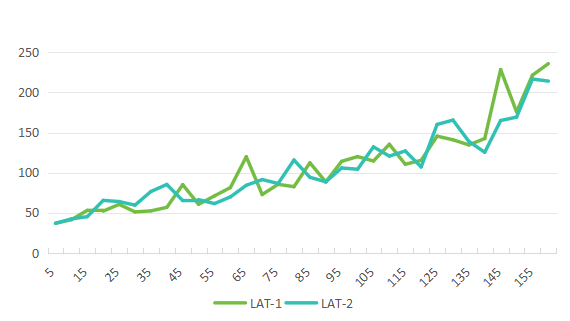
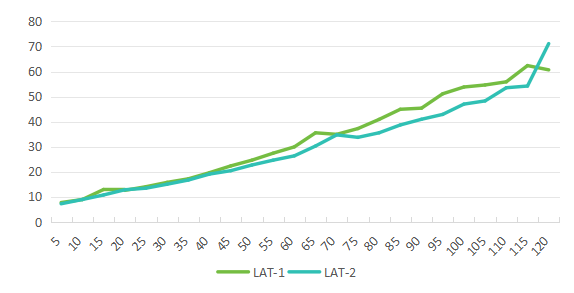
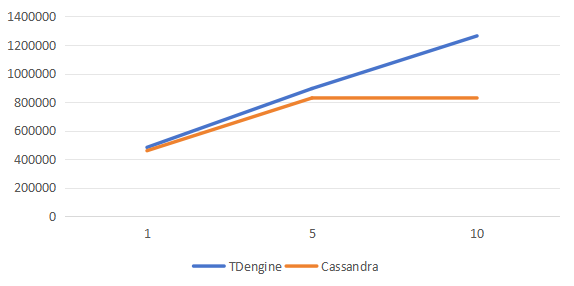
测试机作为客户端,与TDengine服务不在同一个局域网内的情况下测试结果:
file

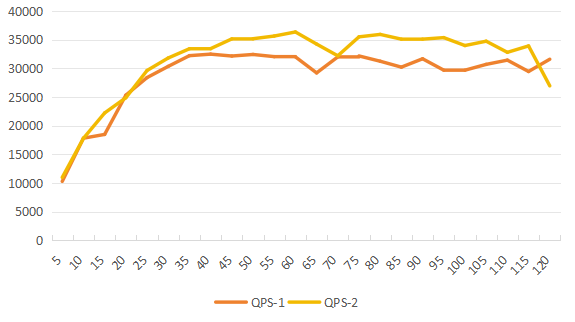
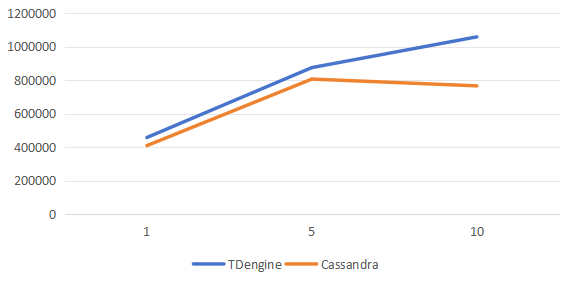
测试机作为客户端,与TDengine服务在同一个局域网内的情况下测试结果:
file

参考资料

https://jmeter.apache.org/usermanual/build-db-test-plan.html
https://jmeter.apache.org/usermanual/generating-dashboard.html
https://docs.taosdata.com/connector/java/
https://docs.taosdata.com/taos-sql/table/

TDengine 2.6集群版升级到3.0集群版

本文记录了在由三个物理节点组成的集群上,原地将TDengine 2.6版升级到3.0版的过程,由于3.0的改动比较大,所以此次升级并非完全平滑的升级,只升级了数据库服务,没有将数据库里的存量数据导入到新版环境,如需保留数据请联系taos团队。本文使用的TDengine版本均为社区版,非docker安装。

一、卸载2.6版

备份配置文件

> ansible allnode -m shell -a "mv /etc/taos/ /etc/taos.bak"

按taos文档说明卸载程序后配置文件是会保留的,但3.0版与2.6版的配置文件(配置项)有差异,直接让3.0使用2.6版配置文件会导致服务启动失败。因此决定自行保留并在安装后再3.0版的配置文件:

当缺省配置文件( /etc/taos/taos.cfg )存在时,仍然使用已有的配置文件,安装包中携带的配置文件修改为taos.cfg.org保存在 /usr/local/taos/cfg/ 目录

备份数据文件

数据文件默认位置在/usr/local/taos/data

> ansible allnode -m shell -a "mv /data/tdengine /data/tdengine.bak"

如果升级3.0失败需要恢复为2.6版,则备份的数据文件会起作用,否则可以删除。数据文件的位置以taos.cfg文件内的配置为准。

停止taosd服务并卸载程序

> ansible allnode -m shell -a "systemctl stop taosd"
> ansible allnode -m shell -a "rpm -e tdengine"

192.168.130.153 | CHANGED | rc=0 >>
taosadapter is running, stopping it...
TDengine is removed successfully!
192.168.130.154 | CHANGED | rc=0 >>
taosadapter is running, stopping it...
TDengine is removed successfully!
192.168.130.152 | CHANGED | rc=0 >>
taosadapter is running, stopping it...
TDengine is removed successfully!

其中ansible allnode -m shell -a命令是为了方便在集群所有节点上一起执行,如果没有装ansible工具可在每个节点上手工执行,效果是一样的。

二、安装TDengine3.0

下载单机版安装包

TDengine提供了多种格式的安装包,我们在CentOS上选择使用RPM版的。

> wget https://www.taosdata.com/assets-download/3.0/TDengine-server-3.0.1.5-Linux-x64.rpm

由于安装过程中需要输入一些信息,所以建议在每个节点上手工执行(而非通过ansible):

> rpm -ivh TDengine-server-3.0.1.5-Linux-x64.rpm

安装过程会提示输入两个信息,按taos的安装说明输入即可(我两个都选择了回车跳过):

当安装第一个节点时,出现 Enter FQDN: 提示的时候,不需要输入任何内容。只有当安装第二个或以后更多的节点时,才需要输入已有集群中任何一个可用节点的 FQDN,支持该新节点加入集群。当然也可以不输入,而是在新节点启动前,配置到新节点的配置文件中。

三、修改taos配置文件

根据之前备份的2.6版的taos.cfg文件修改3.0版的配置文件,我这里主要改的是firstEpfqdnlogDirdataDirtimezonecharset等几个:

# first fully qualified domain name (FQDN) for TDengine system
firstEp                   taos-1:6030
# local fully qualified domain name (FQDN)
fqdn                      taos-1
# The directory for writing log files
 logDir                    /data/tdengine/log
# All data files are stored in this directory
 dataDir                  /data/tdengine/data
# system time zone
 timezone              Asia/Shanghai (CST, +0800)
# system locale
 locale                    en_US.UTF-8
# default system charset
 charset                   UTF-8

为节约时间,可以先改好第一个节点的,再复制到其他节点,然后只要去每个节点修改fqdn的值即可。

> scp /etc/taos/taos.cfg root@taos-2:/etc/taos/taos.cfg
> scp /etc/taos/taos.cfg root@taos-3:/etc/taos/taos.cfg

四、启动taosd并查看状态

启动第一个节点

在第一个节点(firstEp)上启动taosd服务,并验证服务启动成功:

> systemctl start taosd
> systemctl status taosd

此处如果遇到启动失败可进一步查看日志文件来找原因。遇到过一个DND ERROR failed to start since read config error的错误比较坑,原因提示不明确。后来发现是hostname与taos.cfg不匹配造成的。

在taos命令行里验证此时有一个dnode:

> taos
taos> show dnodes;
     id      |            endpoint            | vnodes | support_vnodes |   status   |       create_time       |              note              |
=================================================================================================================================================
           1 | taos-1:6030                    |      0 |             16 | ready      | 2022-10-26 14:50:57.131 |                                |
Query OK, 1 rows in database (0.003960s)

添加其他节点

与第一个节点类似,只不过启动后要在taos命令行里执行create dnode命令将当前节点添加到集群。

> systemctl start taosd
> systemctl status taosd
> taos

taos> create dnode "taos-2";
Query OK, 0 of 0 rows affected (0.002127s)

taos> show dnodes;
     id      |            endpoint            | vnodes | support_vnodes |   status   |       create_time       |              note              |
=================================================================================================================================================
           1 | taos-1:6030                    |      0 |             16 | ready      | 2022-10-26 14:50:57.131 |                                |
           2 | taos-2:6030                    |      0 |             16 | ready      | 2022-10-26 14:54:48.635 |                                |
Query OK, 2 rows in database (0.003566s)

五、创建数据库用户(可选)

创建必要的数据库用户:

> taos -s "CREATE USER k2data PASS 'xxxxxxxx';"

创建必要的database:

注意在2.6里的DAYS改为DURATION了,且3.0不支持UPDATE参数了(相当于UPDATE=1不可修改):

taos -s 'CREATE DATABASE repos REPLICA 3 KEEP 3650 DURATION 10;'

至此TDengine版本升级完成。

参考资料

TDengine多种安装包的安装和卸载

使用安装包立即开始

集群部署和管理

Zookeeper启动失败和解决一例

服务器重启后zookeeper启动失败,报错日志如下:

zookeeper    | ZooKeeper JMX enabled by default
zookeeper    | Using config: /opt/zookeeper-3.4.13/bin/../conf/zoo.cfg
zookeeper    | 2022-10-05 17:24:53,976 [myid:] - INFO  [main:QuorumPeerConfig@136] - Reading configuration from: /opt/zookeeper-3.4.13/bin/../conf/zoo.cfg
zookeeper    | 2022-10-05 17:24:53,979 [myid:] - INFO  [main:DatadirCleanupManager@78] - autopurge.snapRetainCount set to 3
zookeeper    | 2022-10-05 17:24:53,979 [myid:] - INFO  [main:DatadirCleanupManager@79] - autopurge.purgeInterval set to 1
zookeeper    | 2022-10-05 17:24:53,980 [myid:] - WARN  [main:QuorumPeerMain@116] - Either no config or no quorum defined in config, running  in standalone mode
zookeeper    | 2022-10-05 17:24:53,980 [myid:] - INFO  [PurgeTask:DatadirCleanupManager$PurgeTask@138] - Purge task started.
zookeeper    | 2022-10-05 17:24:53,990 [myid:] - INFO  [main:QuorumPeerConfig@136] - Reading configuration from: /opt/zookeeper-3.4.13/bin/../conf/zoo.cfg
zookeeper    | 2022-10-05 17:24:53,990 [myid:] - INFO  [main:ZooKeeperServerMain@98] - Starting server
zookeeper    | 2022-10-05 17:24:53,995 [myid:] - INFO  [main:Environment@100] - Server environment:zookeeper.version=3.4.13-2d71af4dbe22557fda74f9a9b4309b15a7487f03, built on 06/29/2018 04:05 GMT
zookeeper    | 2022-10-05 17:24:53,996 [myid:] - INFO  [main:Environment@100] - Server environment:host.name=fdf9214b4b7e
zookeeper    | 2022-10-05 17:24:53,996 [myid:] - INFO  [main:Environment@100] - Server environment:java.version=1.7.0_65
zookeeper    | 2022-10-05 17:24:53,996 [myid:] - INFO  [main:Environment@100] - Server environment:java.vendor=Oracle Corporation
zookeeper    | 2022-10-05 17:24:53,996 [myid:] - INFO  [main:Environment@100] - Server environment:java.home=/usr/lib/jvm/java-7-openjdk-amd64/jre
zookeeper    | 2022-10-05 17:24:53,996 [myid:] - INFO  [main:Environment@100] - Server environment:java.class.path=/opt/zookeeper-3.4.13/bin/../build/classes:/opt/zookeeper-3.4.13/bin/../build/lib/*.jar:/opt/zookeeper-3.4.13/bin/../lib/slf4j-log4j12-1.7.25.jar:/opt/zookeeper-3.4.13/bin/../lib/slf4j-api-1.7.25.jar:/opt/zookeeper-3.4.13/bin/../lib/netty-3.10.6.Final.jar:/opt/zookeeper-3.4.13/bin/../lib/log4j-1.2.17.jar:/opt/zookeeper-3.4.13/bin/../lib/jline-0.9.94.jar:/opt/zookeeper-3.4.13/bin/../lib/audience-annotations-0.5.0.jar:/opt/zookeeper-3.4.13/bin/../zookeeper-3.4.13.jar:/opt/zookeeper-3.4.13/bin/../src/java/lib/*.jar:/opt/zookeeper-3.4.13/bin/../conf:
zookeeper    | 2022-10-05 17:24:53,996 [myid:] - INFO  [main:Environment@100] - Server environment:java.library.path=/usr/java/packages/lib/amd64:/usr/lib/x86_64-linux-gnu/jni:/lib/x86_64-linux-gnu:/usr/lib/x86_64-linux-gnu:/usr/lib/jni:/lib:/usr/lib
zookeeper    | 2022-10-05 17:24:53,996 [myid:] - INFO  [main:Environment@100] - Server environment:java.io.tmpdir=/tmp
zookeeper    | 2022-10-05 17:24:53,996 [myid:] - INFO  [main:Environment@100] - Server environment:java.compiler=<NA>
zookeeper    | 2022-10-05 17:24:53,998 [myid:] - INFO  [main:Environment@100] - Server environment:os.name=Linux
zookeeper    | 2022-10-05 17:24:53,998 [myid:] - INFO  [main:Environment@100] - Server environment:os.arch=amd64
zookeeper    | 2022-10-05 17:24:53,998 [myid:] - INFO  [main:Environment@100] - Server environment:os.version=4.4.249-1.el7.elrepo.x86_64
zookeeper    | 2022-10-05 17:24:53,998 [myid:] - INFO  [main:Environment@100] - Server environment:user.name=root
zookeeper    | 2022-10-05 17:24:53,999 [myid:] - INFO  [main:Environment@100] - Server environment:user.home=/root
zookeeper    | 2022-10-05 17:24:53,999 [myid:] - INFO  [main:Environment@100] - Server environment:user.dir=/opt/zookeeper-3.4.13
zookeeper    | 2022-10-05 17:24:54,000 [myid:] - INFO  [PurgeTask:DatadirCleanupManager$PurgeTask@144] - Purge task completed.
zookeeper    | 2022-10-05 17:24:54,000 [myid:] - INFO  [main:ZooKeeperServer@836] - tickTime set to 2000
zookeeper    | 2022-10-05 17:24:54,000 [myid:] - INFO  [main:ZooKeeperServer@845] - minSessionTimeout set to -1
zookeeper    | 2022-10-05 17:24:54,000 [myid:] - INFO  [main:ZooKeeperServer@854] - maxSessionTimeout set to -1
zookeeper    | 2022-10-05 17:24:54,007 [myid:] - INFO  [main:ServerCnxnFactory@117] - Using org.apache.zookeeper.server.NIOServerCnxnFactory as server connection factory
zookeeper    | 2022-10-05 17:24:54,010 [myid:] - INFO  [main:NIOServerCnxnFactory@89] - binding to port 0.0.0.0/0.0.0.0:2181
zookeeper    | 2022-10-05 17:24:54,799 [myid:] - ERROR [main:ZooKeeperServerMain@66] - Unexpected exception, exiting abnormally
zookeeper    | java.io.EOFException
zookeeper    |  at java.io.DataInputStream.readInt(DataInputStream.java:392)
zookeeper    |  at org.apache.jute.BinaryInputArchive.readInt(BinaryInputArchive.java:63)
zookeeper    |  at org.apache.zookeeper.server.persistence.FileHeader.deserialize(FileHeader.java:66)
zookeeper    |  at org.apache.zookeeper.server.persistence.FileTxnLog$FileTxnIterator.inStreamCreated(FileTxnLog.java:585)
zookeeper    |  at org.apache.zookeeper.server.persistence.FileTxnLog$FileTxnIterator.createInputArchive(FileTxnLog.java:604)
zookeeper    |  at org.apache.zookeeper.server.persistence.FileTxnLog$FileTxnIterator.goToNextLog(FileTxnLog.java:570)
zookeeper    |  at org.apache.zookeeper.server.persistence.FileTxnLog$FileTxnIterator.next(FileTxnLog.java:650)
zookeeper    |  at org.apache.zookeeper.server.persistence.FileTxnSnapLog.fastForwardFromEdits(FileTxnSnapLog.java:219)
zookeeper    |  at org.apache.zookeeper.server.persistence.FileTxnSnapLog.restore(FileTxnSnapLog.java:176)
zookeeper    |  at org.apache.zookeeper.server.ZKDatabase.loadDataBase(ZKDatabase.java:217)
zookeeper    |  at org.apache.zookeeper.server.ZooKeeperServer.loadData(ZooKeeperServer.java:284)
zookeeper    |  at org.apache.zookeeper.server.ZooKeeperServer.startdata(ZooKeeperServer.java:407)

一开始怀疑是zoo.cfg损坏,但查看后发现文件没有明显异常。将/opt/zookeeper-3.4.13/data/version-2目录改名为version-2.bak后重启zookeeper正常(但client连接报错 zxid 0x02 our last zxid is 0x0 client must try another server,因为前面的操作导致zk这边的事务id被重置了),说明可能是data下有文件损坏。

进一步查看version-2.bak下的文件,发现有一个0字节的log文件:

file

删除此文件并将version-2.bak改回原来的名字version-2,重启zookeeper成功,并且client连接正常。

Linux inode和常用操作

Linux系统里的inode中文名索引文件,用于保存文件的大小、时间、权限等元信息。每个文件都对应一个inode,每个inode也对应一个文件。因为在Linux里目录、设备等也是文件,所以也对应一个inode。

inode与文件块是分开保存的,它们都会占用磁盘空间,通常情况下是后者先占满,但当磁盘上有大量小文件时,可能前者会先达到上限,从而导致磁盘虽然还有空间但无法写入新文件。这种场景应提前考虑增加inode的上限数量,例如将2KB降为1KB。

file
图片来源:Wikipedia

让我们做一些实验来验证一下inode的行为:

查看磁盘已用和可用inode数量

执行df -i可查看分区里inode数量,一个分区下最大inode数量是格式化时确定的,默认最大数量是分区大小除以2KB得到
file

查看文件inode信息

执行ls -i可查看当前目录每个文件的inode值:
file

验证软链接有自己的inode

软链接是一个文件,其inode值与链接目标文件是不相同的。
file

验证硬链接共享同一个inode

硬链接不是一个文件,其inode号与链接目标文件相同。其实很正常,linux内部对文件的管理都是通过inode完成的,文件名只是一个易读的符号。
file

验证.和..是硬链接

分别对应当前目录的inode和上一级目录的inode。
file

验证通过inode号反查文件名

find -inum命令:
file

文件名存储在哪里?

inode里并不保存文件名(否则硬链接无法实现),那么文件名存储在哪里?答案是存储在“目录文件”里,当我们ls时,Linux就查询目录文件(但我们不能直接cat目录),此文件包含此目录下所有文件名到inode的映射关系。
file

注:以上均默认ext2文件系统。

在Python里访问Java对象 – Py4J

Py4J是一套java+python软件包,利用它开发者可以在python里动态的访问jvm里的java对象,其基本原理是在java端创建一个Socket服务,在python端使用Socket客户端调用,Py4J在python语法上的进行了精心的包装,使得在python里的这些远程java对象使用起来与本地的python对象十分接近。

环境信息

Java Python Py4J
11.0.10 3.8.5 0.10.9.7

Java服务端

创建一个新的java工程,并在pom.xml里引入py4j依赖:

<dependency>
    <groupId>net.sf.py4j</groupId>
    <artifactId>py4j</artifactId>
    <version>0.10.9.7</version>
</dependency>

以下借用py4j官方提供的例子。首先定义一个Java类提供一些功能,这里是用一个堆栈类作为例子,提供了push, pop等功能:

package py4j.examples;

import java.util.LinkedList;
import java.util.List;

public class Stack {
    private List<String> internalList = new LinkedList<String>();

    public void push(String element) {
        internalList.add(0, element);
    }

    public String pop() {
        return internalList.remove(0);
    }

    public List<String> getInternalList() {
        return internalList;
    }

    public void pushAll(List<String> elements) {
        for (String element : elements) {
            this.push(element);
        }
    }
}

然后要提供一个对应的EntryPoint类作为服务提供者,这个类实现main函数,执行后会启动一个Socket服务,用于接收python客户端的请求。

package py4j.examples;

import py4j.GatewayServer;

public class StackEntryPoint {

    private Stack stack;

    public StackEntryPoint() {
        stack = new Stack();
        stack.push("Initial Item");
    }

    public Stack getStack() {
        return stack;
    }

    public static void main(String[] args) {
        // 默认端口号25335,可以在构造方法里配置其他端口号
        GatewayServer gatewayServer = new GatewayServer(new StackEntryPoint());
        gatewayServer.start();
        System.out.println("Gateway Server Started");
    }

}

直接执行StackEntryPoint就启动了Java服务端。

Python客户端

首先安装py4j的最新版本:

> pip install py4j

在python命令行里执行下面的代码就可以获得一个Stack对象,其中.entry_point得到的是GatewayServer里的StackEntryPoint实例。

>>> from py4j.java_gateway import JavaGateway
>>> gateway = JavaGateway()
>>> stack = gateway.entry_point.getStack()

测试一下这个Stack对象的功能:

>>> stack
JavaObject id=o0

>>> stack.getInternalList()
['Initial Item']

>>> stack.push('item2')
>>> stack.getInternalList()
['item2', 'Initial Item']

Stack里可以直接push字符串,也可以push一个java的list:

>>> list = gateway.jvm.java.util.ArrayList()
>>> list.add('item3')
>>> list.add('item4')
>>> stack.pushAll(list)
>>> stack.getInternalList()
['item4', 'item3', 'item2', 'Initial Item']

但不可以直接push一个python的list,将会抛出异常。需要借助py4j提供的ListConverter先转换为java list:

>>> stack.pushAll(['item3','item4'])
Traceback (most recent call last):
  File "<stdin>", line 1, in <module>
  File "C:\Users\zhanghao\anaconda3\lib\site-packages\py4j\java_gateway.py", line 1314, in __call__
    args_command, temp_args = self._build_args(*args)
  File "C:\Users\zhanghao\anaconda3\lib\site-packages\py4j\java_gateway.py", line 1283, in _build_args
    [get_command_part(arg, self.pool) for arg in new_args])
  File "C:\Users\zhanghao\anaconda3\lib\site-packages\py4j\java_gateway.py", line 1283, in <listcomp>
    [get_command_part(arg, self.pool) for arg in new_args])
  File "C:\Users\zhanghao\anaconda3\lib\site-packages\py4j\protocol.py", line 298, in get_command_part
    command_part = REFERENCE_TYPE + parameter._get_object_id()
AttributeError: 'list' object has no attribute '_get_object_id'

如果要在python里使用任意的Java对象,可以用gateway.jvm引用完整的java类名来创建对象实例:

>>> random = gateway.jvm.java.util.Random()
>>> random.nextInt()
433815240

所以在本文的例子里,gateway.entry_point.getStack()gateway.jvm.py4j.examples.Stack()基本是等价的,除了前者是单例的,初始化的内容有所不同。

参考资料

https://www.py4j.org/getting_started.html

PySpark使用HBase Spark Connector访问Hbase数据

Spark从1.2版开始提供了被称为Spark SQL Data Sources API的扩展机制,允许用户将任意形式的数据对接到Spark作为数据源,在Spark里可以用统一的方式访问这些数据。

All of the scheduling and execution in Spark is done based on these methods, allowing each RDD to implement its own way of computing itself. Indeed, users can implement custom RDDs (e.g. for reading data from a new storage system) by overriding these functions. Please refer to the Spark paper for more details on RDD internals.

HBase Spark Connector就是HBase官方提供的这样一个数据源的实现,相当于Spark与HBase之间的桥梁(见下图)。本文介绍如何安装、配置和在Spark中使用此连接器。为节约篇幅,本文中将HBase Spark Connector简称为hsc

file

注意,在github上还有一个名为Spark Hbase Connector的项目,简称shc,是Hortonworks提供的,此项目最后commit停在2020年1月,而hsc截至2022年12月仍有新的代码在提交。因此更推荐使用hsc而不是shc。

环境信息

HBase Spark PySpark Hadoop Maven 操作系统
2.5.1 集群版 3.1.3 3.1.3 3.2.3 3.8.2 CentOS 7.9

获取hsc

首先从github下载项目代码,按项目README.md里给出的mvn命令按指定版本编译:

> git clone https://github.com/apache/hbase-connectors.git
> cd hbase-connectors/spark/hbase-spark
> mvn -Dspark.version=3.1.3 -Dscala.version=2.12.10 -Dhadoop-three.version=3.2.3 -Dscala.binary.version=2.12 -Dhbase.version=2.5.1 clean install

编译成功后将得到三个jar文件(hbase-spark.jar、hbase-spark-protocol-shaded.jar和scala-library.jar),按本文环境编译的jar包可以点击下载,如果你的环境版本正好相同可直接使用。

配置hsc

仍然是按项目README.md里的说明配置即可。

客户端配置:
将hbase-site.xml复制到 $SPARK_CONF_DIR 目录下。

服务端配置:
将前面编译得到的三个jar文件复制到hbase region-server安装目录下的lib目录下:

[root@taos-2 lib]# ll /usr/local/hbase-2.5.1/lib
-rw-r--r-- 1 root root   508987 May 30 17:09 hbase-spark-1.0.1-SNAPSHOT.jar
-rw-r--r-- 1 root root    40374 May 30 17:09 hbase-spark-protocol-shaded-1.0.1-SNAPSHOT.jar
-rw-r--r-- 1 root root  5276900 May 30 16:58 scala-library-2.12.10.jar

在PySpark里读取HBase数据

我们直接在python命令行里进行验证(python环境需要已经安装与spark版本相同的pyspark)。

> python3

>>> from pyspark.sql import SparkSession
>>> from pyspark.sql import SQLContext
>>> import pandas as pd

>>> spark = SparkSession.builder.getOrCreate()
>>> sqlContext = SQLContext(spark.sparkContext)

>>> df = sqlContext.read.format( 'org.apache.hadoop.hbase.spark')\
    .option('hbase.table','table1')\
    .option('hbase.columns.mapping','rowKey String :key, col1 String cf1:col1, col2 String cf2:col2')\
    .option("hbase.spark.use.hbasecontext", False)\
    .load()
>>> df.show(2,False)
+----------------------+--------------------------+-----------------------------------------------+
|col1                  |col2                      |rowKey                                         |
+----------------------+--------------------------+-----------------------------------------------+
|{"dq":65012,"cq":3189}|{"stac":1,"ndc":3,"mdc":0}|005e6c9b-d843-4e7c-9fa0-77fe894e42f7_1662393625|
|{"dq":65012,"cq":3189}|{"stac":1,"ndc":3,"mdc":0}|005e6c9b-d843-4e7c-9fa0-77fe894e42f7_1662393686|
+----------------------+--------------------------+-----------------------------------------------+
only showing top 2 rows

至此通过hsc读取hbase数据已经验证通过。上述python命令也可以保存为.py文件,使用spark-submit命令提交。

> spark-submit --name xxx --master yarn --deploy-mode client  spark_hbase_example.py

关于Partition

从hsc代码的HBaseTableScanRDD.scala的实现可以看出,hsc对DataFrame的partition划分是根据hbase region的数量来的,因此如果region数量不合理,就可能需要对DataFrame进行repartition处理从而带来额外的shuffle开销。

@InterfaceAudience.Private
class HBaseTableScanRDD(relation: HBaseRelation,
                       val hbaseContext: HBaseContext,
                       @transient val filter: Option[SparkSQLPushDownFilter] = None,
                        val columns: Seq[Field] = Seq.empty
     ) extends RDD[Result](relation.sqlContext.sparkContext, Nil){

  override def getPartitions: Array[Partition] = {
    val regions = RegionResource(relation)
    logDebug(s"There are ${regions.size} regions")
    val ps = regions.flatMap { x =>
     ...
    }.toArray
    ...
    ps.asInstanceOf[Array[Partition]]
  }
  ...
 }

常见问题

在python里获取SparkSession时报错 PythonUtils.getEncryptionEnabled does not exist in the JVM:

Traceback (most recent call last):
  File "<stdin>", line 1, in <module>
  ...
    self._encryption_enabled = self._jvm.PythonUtils.getEncryptionEnabled(self._jsc)
  File "/disk1/anaconda3/lib/python3.6/site-packages/py4j/java_gateway.py", line 1487, in __getattr__
    "{0}.{1} does not exist in the JVM".format(self._fqn, name))
py4j.protocol.Py4JError: org.apache.spark.api.python.PythonUtils.getEncryptionEnabled does not exist in the JVM

原因是pyspark版本与spark版本不匹配,用下面命令可以查看pyspark当前版本,如果过低需要卸载并安装新版。

> pip show pyspark
Name: pyspark
Version: 2.3.0

> pip install pip -U -i https://pypi.tuna.tsinghua.edu.cn/simple
> pip uninstall pyspark
> pip install pyspark==3.1.3 -i https://pypi.tuna.tsinghua.edu.cn/simple

完整的pyspark版本历史可以在这里查看:https://pypi.org/project/pyspark/#history

启用 SQL Filter pushdown时报错

当使用.option("hbase.spark.pushdown.columnfilter", true)时报错,其实true是默认值,报错信息如下:

java.lang.NoClassDefFoundError: org/apache/hadoop/hbase/spark/datasources/JavaBytesEncoder$

解决方法是,需要将前面提到的scala-library等三个jar包放在每个hbase region server节点的lib目录下。参考链接

参考资料

https://spark.apache.org/docs/latest/hadoop-provided.html
https://hbase.apache.org/book.html#_sparksqldataframes
https://spark.apache.org/docs/latest/api/java/org/apache/spark/rdd/RDD.html
https://github.com/LucaCanali/Miscellaneous/blob/master/Spark_Notes/Spark_HBase_Connector.md

理解TDengine里的虚拟节点(vgroup)

这篇是速记,基于TDengine 2.6版,详情建议看官方文档:数据节点管理

TDengine集群版通过虚拟节点(vgroup)实现database的负载均衡和水平扩展,每个物理节点(dnode)可以包含多个vgroup。每个database由多个table组成,这些table根据创建顺序被分布到不同的vgroup。

database1
    vgroup1
        table1
        table2
        ...
        table10
    vgroup2
        table11
        ...
        table20

table分布到不同vgroup的规则是由taos.cfg里的minTablesPerVnode参数和tableIncStepPerVnode参数控制的,每当database里当前vnode的table数量超过minTablesPerVnode时就会创建一个新的vgroup。这两个参数的默认值很大,如果database里table的数量不多,建议手工配置减小参数值,否则可能所有数据都分配到同一个物理节点产生数据倾斜。

注意:这两个参数修改后需要重启taosd服务,已经创建好的database需要删除重建才会生效。

[root@taos-1 ~]# tail /etc/taos/taos.cfg
...
minTablesPerVnode                 10
tableIncStepPerVnode              10

注意:在tdengine 3.0里minTablesPerVnode和tableIncStepPerVnode这两个参数已经被移除。

TDengine允许指定vgroup的副本数,每个副本是一个vnode。如果vgroup的副本数大于1,则此vgroup里会包含多个vnode,不同的vnode会被分配到不同的物理节点上。

可以在taos命令行里查看vgroups的情况。如下面的命令可以看到,集群包含3个物理节点,数据库里共有80个表,每10个表共用一个vgroup,这些vgroup比较均匀的分布到3个物理节点上。

[root@taos-1 ~]# taos
taos> use database1;
taos> show dnodes;
   id   |           end_point            | vnodes | cores  |   status   | role  |       create_time       |      offline reason      |
======================================================================================================================================
      1 | taos-1:6030                    |     61 |      8 | ready      | any   | 2022-04-03 17:58:10.049 |                          |
      2 | taos-2:6030                    |     61 |      8 | ready      | any   | 2022-04-03 17:58:15.756 |                          |
      3 | taos-3:6030                    |     62 |      8 | ready      | any   | 2022-02-03 17:58:16.287 |                          |
Query OK, 3 row(s) in set (0.008325s)

taos> show vgroups;
    vgId     |   tables    |  status  |   onlines   | v1_dnode | v1_status | compacting  |
==========================================================================================
         536 |          10 | ready    |           1 |        3 | leader    |           0 |
         537 |          10 | ready    |           1 |        2 | leader    |           0 |
         538 |          10 | ready    |           1 |        1 | leader    |           0 |
         539 |          10 | ready    |           1 |        3 | leader    |           0 |
         540 |          10 | ready    |           1 |        2 | leader    |           0 |
         541 |          10 | ready    |           1 |        1 | leader    |           0 |
         542 |          10 | ready    |           1 |        3 | leader    |           0 |
         543 |          10 | ready    |           1 |        2 | leader    |           0 |
Query OK, 8 row(s) in set (0.005023s)

HBase手工删除Region In Transition的表

问题现象

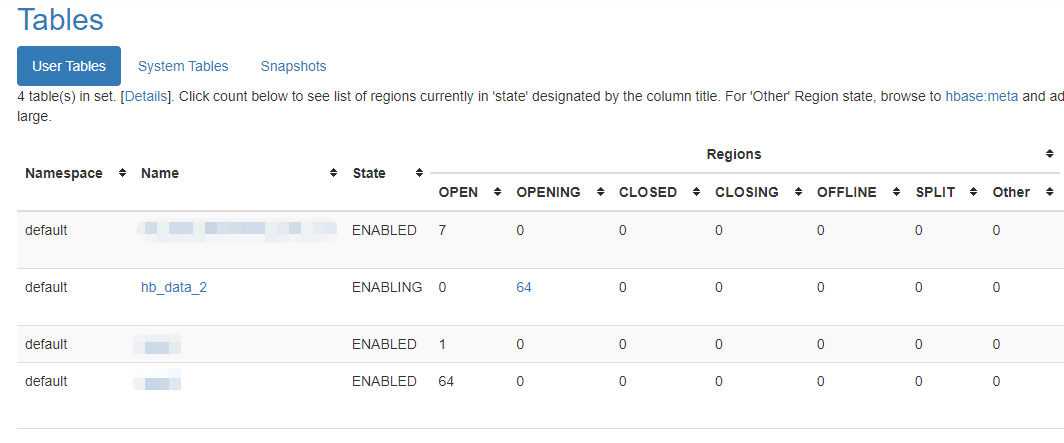
一次预分区建表时卡住,强制重启hbase后发现有不少region处于RIT(Region In Transition)状态:

file

启动hbase发现region server总是启动没几分钟就停止,查看日志发现打开某个表有问题:

2022-02-06T23:22:59,303 WARN  [RS_OPEN_REGION-regionserver/zookeeper-3:16020-0] handler.AssignRegionHandler: Failed to open region hb_data_2,e0000000,1670290921940.99fbb79e62c2182aab011931a36e210f., will report to master
2022-02-06T23:55:08,541 ERROR [RS_OPEN_REGION-regionserver/zookeeper-3:16020-1] regionserver.HRegionServer: ***** ABORTING region server zookeeper-3,16020,1670342087370: Replay of WAL required. Forcing server shutdown *****
org.apache.hadoop.hbase.DroppedSnapshotException: region: hb_data_2,60000000,1670311834912.9887284106bf70971f4a457e16558183.
        at org.apache.hadoop.hbase.regionserver.HRegion.internalFlushCacheAndCommit(HRegion.java:2903) ~[hbase-server-2.5.1.jar:2.5.1]
        at org.apache.hadoop.hbase.regionserver.HRegion.internalFlushcache(HRegion.java:2580) ~[hbase-server-2.5.1.jar:2.5.1]
        at org.apache.hadoop.hbase.regionserver.HRegion.replayRecoveredEditsIfAny(HRegion.java:5144) ~[hbase-server-2.5.1.jar:2.5.1]
        at org.apache.hadoop.hbase.regionserver.HRegion.initializeRegionInternals(HRegion.java:1003) ~[hbase-server-2.5.1.jar:2.5.1]
        at org.apache.hadoop.hbase.regionserver.HRegion.initialize(HRegion.java:941) ~[hbase-server-2.5.1.jar:2.5.1]

删除损坏的表

为了不影响业务,决定先删除创建失败的表hb_data_2。

> zkCli.sh
> rmr /hbase/table/hb_data_2

> hdfs dfs -rmr /hbase/data/default/hb_data_2

需要删除的region数量有200多个左右,一般文章介绍的方法是在hbase:meta表里删除:

deleteall 'hbase:meta', '...'

但这次问题region数量比较多,可以用HBCK工具提供的extraRegionsInMeta --fix命令批量删除,该命令的作用是扫描hbase:meta里存在但目录不存在的那些region,如果使用--fix命令则会自动从hbase:meta里删除这些region:

> hbase hbck -j /usr/local/hbase-hbck2/hbase-hbck2-1.2.0.jar extraRegionsInMeta  --fix default

Regions that had no dir on the FileSystem and got removed from Meta: 64
Regions in Meta but having no equivalent dir, for each table:
        hb_data_2-> ec86493893d7742525919263abd01c2c e23d0e908125730a5e1095720bf13e50 ...

清理后重启hbase,可以看到RIT的region已经不在了。

个别region删除不掉

按上面方法清理后,发现有个别region仍然在opening状态,即使在hbase:meta里删除,重启hbase服务后发现region又被恢复回来。此时可以在hbase web ui里的"procedures & locks"里看到对应的进程和进程号。用hbck2的bypass命令可以清除,注意加-o参数否则可能失败:

> hbase hbck -j /usr/local/hbase-hbck2/hbase-hbck2-1.2.0.jar bypass -r -o 412150

然后再去删除一遍hbase:meta里问题region的对应记录即可:

scan 'hbase:meta', {STARTROW=>'hb_data_3', LIMIT=>2}
hbase:011:0> deleteall 'hbase:meta','hb_data_3,f8000000,1670290921940.e4bb0233b1f0130e661a347127087e7d.'

HBCK2安装方法

HBase2默认带的工具是旧版的HBCK1,所以需要先安装HBCK2。建议从源码编译安装使得版本与hbase严格匹配,如果直接下载bin版运行抛出异常的概率比较高。

首先下载源码(从国内镜像下载比较快):

> wget https://mirrors.tuna.tsinghua.edu.cn/apache/hbase/hbase-operator-tools-1.2.0/hbase-operator-tools-1.2.0-src.tar.gz --no-check-certificate
> tar zxvf hbase-operator-tools-1.2.0-src.tar.gz

然后手工修改pom.xml里的hbase.version与当前使用的版本一致(注意,log4j2的版本也需要与hbase的保持一致):

> vi pom.xml
<hbase.version>2.5.1</hbase.version>
<log4j2.version>2.17.2</log4j2.version>

编译源码,这一步时间大约1个小时,主要是download依赖项比较慢:

> mvn install

hbck2 1.2.0对hbase 2.5.1版编译有两个用例不通过:

[INFO] Results:
[INFO]
[ERROR] Errors:
[ERROR]   TestMissingTableDescriptorGenerator.shouldGenerateTableInfoBasedOnCachedTableDescriptor:91 » IllegalArgument
[ERROR]   TestMissingTableDescriptorGenerator.shouldGenerateTableInfoBasedOnFileSystem:121 » IllegalArgument
[INFO]
[ERROR] Tests run: 72, Failures: 0, Errors: 2, Skipped: 0
[INFO]
[INFO] ------------------------------------------------------------------------
[INFO] Reactor Summary for Apache HBase Operator Tools 1.2.0:
[INFO]
[INFO] Apache HBase Operator Tools ........................ SUCCESS [09:14 min]
[INFO] Apache HBase - Table Reporter ...................... SUCCESS [13:53 min]
[INFO] Apache HBase - HBCK2 ............................... FAILURE [33:07 min]
[INFO] Apache HBase - HBase Tools ......................... SKIPPED
[INFO] Apache HBase Operator Tools - Assembly ............. SKIPPED
[INFO] ------------------------------------------------------------------------
[INFO] BUILD FAILURE
[INFO] ------------------------------------------------------------------------
[INFO] Total time:  56:15 min
[INFO] Finished at: 2022-02-06T21:53:23+08:00
[INFO] ------------------------------------------------------------------------

猜测原因是hbck2版本没跟上hbase版本,暂时skip掉testcases解决:

> mvn install -Dmaven.test.skip=true

参考资料

https://github.com/apache/hbase-operator-tools/tree/master/hbase-hbck2
https://zhuanlan.zhihu.com/p/373957937

HBase导出和导入表数据 (Export/Import)

本文假设我们要导出HBase里名为table1的表,其中包含名为cf1的列族,然后再将导出的文件导入到另一个环境里。

环境信息

HBase Zookeeper Hadoop 操作系统
2.5.1 集群版 3.4.8 3.2.3 CentOS 7.9

导出

1. 记录HBase表结构

HBase没有提供直接导出创建表的命令的方法,我们可以在HBase命令行里执行describe命令查看表名和列族名,然后整理得到建表命令,此命令在导入时需要用到:

> hbase shell
hbase:001:0> describe 'table1'
Table table1 is ENABLED
table1, {TABLE_ATTRIBUTES => {METADATA => {'hbase.store.file-tracker.impl' => 'DEFAULT'}}}
COLUMN FAMILIES DESCRIPTION
{NAME => 'cf1', INDEX_BLOCK_ENCODING => 'NONE', VERSIONS => '1', KEEP_DELETED_CELLS => 'FALSE', DATA_BLOCK_ENCODING => 'NONE', TTL => 'FOREVER', MIN_VERSIONS => '0', REPLICATION_SCOPE => '0', BLOOM
FILTER => 'ROW', IN_MEMORY => 'false', COMPRESSION => 'SNAPPY', BLOCKCACHE => 'true', BLOCKSIZE => '65536 B (64KB)'}

整理以后可以得到完整的建表语句,如下所示:

create 'table1','cf1', 
    {VERSIONS => '1', KEEP_DELETED_CELLS => 'FALSE', 
    DATA_BLOCK_ENCODING => 'NONE', TTL => 'FOREVER', MIN_VERSIONS => '0', 
    REPLICATION_SCOPE => '0', BLOOMFILTER => 'ROW', IN_MEMORY => 'false', 
    COMPRESSION => 'SNAPPY', BLOCKCACHE => 'true'}

2. 导出HBase表数据

用HBase提供的Export命令可以导出表table1的数据,导出的内容在hdfs指定目录/foo/table1下(此目录不能已存在),文件名是part-m-00000_这样的格式:

> hbase org.apache.hadoop.hbase.mapreduce.Export -Dmapred.output.compress=true table1 /foo/table1

上面的命令会启动一个MapReduce作业,可以用-D指定一些MapReduce参数,例如结果文件是否压缩;也可以指定要导出的数据版本和时间戳范围,如果不指定则导出最新版本和全部时间范围。我发现官方文档对Export工具的介绍不够全面,很多-D参数都没有包含,如有需要可以看本文最后的附录部分。

导出作业执行时间的长短主要取决于数据量的大小,等作业执行完成后可以在hdfs上看到导出结果,是经过压缩的SequenceFile格式:

> hdfs dfs -ls /foo/table1
Found 3 items
-rw-r--r--   3 hdfs supergroup          0 2022-03-22 13:20 /foo/table1/_SUCCESS
-rw-r--r--   3 hdfs supergroup 1609084326 2022-03-22 13:20 /foo/table1/part-m-00000_
-rw-r--r--   3 hdfs supergroup 1151428929 2022-03-22 13:20 /foo/table1/part-m-00001_

有些文章提到可以用file:///local/path形式的路径导出到本地,实际测试发现导出的文件可能出现在集群里任意节点的本地磁盘,导入时也有类似问题,很可能会提示文件不存在。因此还是建议先导出到hdfs再下载。

要将文件从hdfs下载到本地磁盘,使用下面的命令:

> hdfs dfs -get /foo/table1/* /my/local/path

导入

1. 创建HBase表

导入数据前需要先手工创建表和列族,其中表名可以与导出时的表名不同,但列族名必须保持相同。建表时可以根据需要使用与原表不同的参数,例如预分区的配置,这里为了节约篇幅使用了默认的建表选项而非前面整理得到的完整建表语句:

> hbase shell
hbase:001:0> create 'table1', 'cf1'

列族里的列名不需要手工创建,下一步导入数据的时候会自动恢复。

2. 导入HBase表数据

如果数据文件在本地磁盘,需要先使用下面的命令上传到hdfs:

> hdfs dfs -put /my/local/path/* /bar/table1

将之前导出的数据恢复到表table1,此命令也是通过启动一个MapReduce作业实现的:

> hbase org.apache.hadoop.hbase.mapreduce.Import table1 /bar/table1/*

导入任务完成后,检查一下前3条数据是否正常:

> hbase shell
hbase:001:0> scan 'table1', {LIMIT=>3}

常见问题

由于要启动MapReduce作业完成导入导出,在执行HBase导入导出命令的时候可能会提示配置缺少几个必要的配置项。按照提示在mapred-site.xml文件里添加下面的配置即可(值按实际填写):

<property>
  <name>yarn.app.mapreduce.am.env</name>
  <value>HADOOP_MAPRED_HOME=...</value>
</property>
<property>
  <name>mapreduce.map.env</name>
  <value>HADOOP_MAPRED_HOME=...</value>
</property>
<property>
  <name>mapreduce.reduce.env</name>
  <value>HADOOP_MAPRED_HOME=...</value>
</property>

附录

HBase官方文档里没有给出Export和Import的全部参数,网上也少有文章介绍,实际上直接不带参数执行这两个命令就可以看到每个参数的用法。

Export命令参考

> hbase org.apache.hadoop.hbase.mapreduce.Export
ERROR: Wrong number of arguments: 0
Usage: Export [-D <property=value>]* <tablename> <outputdir> [<versions> [<starttime> [<endtime>]] [^[regex pattern] or [Prefix] to filter]]

  Note: -D properties will be applied to the conf used.
  For example:
   -D mapreduce.output.fileoutputformat.compress=true
   -D mapreduce.output.fileoutputformat.compress.codec=org.apache.hadoop.io.compress.GzipCodec
   -D mapreduce.output.fileoutputformat.compress.type=BLOCK
  Additionally, the following SCAN properties can be specified
  to control/limit what is exported..
   -D hbase.mapreduce.scan.column.family=<family1>,<family2>, ...
   -D hbase.mapreduce.include.deleted.rows=true
   -D hbase.mapreduce.scan.row.start=<ROWSTART>
   -D hbase.mapreduce.scan.row.stop=<ROWSTOP>
   -D hbase.client.scanner.caching=100
   -D hbase.export.visibility.labels=<labels>
For tables with very wide rows consider setting the batch size as below:
   -D hbase.export.scanner.batch=10
   -D hbase.export.scanner.caching=100
   -D mapreduce.job.name=jobName - use the specified mapreduce job name for the export
For MR performance consider the following properties:
   -D mapreduce.map.speculative=false
   -D mapreduce.reduce.speculative=false

Import命令使用参考

> hbase org.apache.hadoop.hbase.mapreduce.Import
ERROR: Wrong number of arguments: 0
Usage: Import [options] <tablename> <inputdir>
By default Import will load data directly into HBase. To instead generate
HFiles of data to prepare for a bulk data load, pass the option:
  -Dimport.bulk.output=/path/for/output
If there is a large result that includes too much Cell whitch can occur OOME caused by the memery sort in reducer, pass the option:
  -Dimport.bulk.hasLargeResult=true
 To apply a generic org.apache.hadoop.hbase.filter.Filter to the input, use
  -Dimport.filter.class=<name of filter class>
  -Dimport.filter.args=<comma separated list of args for filter
 NOTE: The filter will be applied BEFORE doing key renames via the HBASE_IMPORTER_RENAME_CFS property. Futher, filters will only use the Filter#filterRowKey(byte[] buffer, int offset, int length) method to identify  whether the current row needs to be ignored completely for processing and  Filter#filterCell(Cell) method to determine if the Cell should be added; Filter.ReturnCode#INCLUDE and #INCLUDE_AND_NEXT_COL will be considered as including the Cell.
To import data exported from HBase 0.94, use
  -Dhbase.import.version=0.94
  -D mapreduce.job.name=jobName - use the specified mapreduce job name for the import
For performance consider the following options:
  -Dmapreduce.map.speculative=false
  -Dmapreduce.reduce.speculative=false
  -Dimport.wal.durability=<Used while writing data to hbase. Allowed values are the supported durability values like SKIP_WAL/ASYNC_WAL/SYNC_WAL/...>

参考链接

https://hbase.apache.org/book.html#export
https://hbase.apache.org/book.html#import
https://stackoverflow.com/questions/34243134/what-is-sequence-file-in-hadoop