Java读写本地Parquet格式数据文件

Apache Parquet是大数据平台里广泛使用的一种开源的列式文件存储格式,MapReduce和Spark等计算框架都内置了对读写Parquet文件的支持,通常Parquet文件放在HDFS上使用。

有时我们需要用Java直接读写本地的Parquet文件,在没有MapReduce或Spark等工具的情况下,要实现读写Parquet文件可以借助hadoop-clientparquet-hadoop这两个包实现。

一、依赖类库

首先需要在Java工程的pom.xml里添加下面的依赖项(引入hadoop-client会显著增大fat jar包的体积,但目前没有很好的替代方案):

<dependency>
    <groupId>org.apache.hadoop</groupId>
    <artifactId>hadoop-client</artifactId>
    <version>2.7.7</version>
</dependency>
<dependency>
    <groupId>org.apache.parquet</groupId>
    <artifactId>parquet-hadoop</artifactId>
    <version>1.10.1</version>
</dependency>

二、将数据写入Parquet文件

Parquet官方提供了org.apache.parquet.example.data.Group作为一条记录的对象,这里演示以此对象写入parquet文件的方法。为了简化示例代码,parquet文件里每一列的类型都使用整型。

import org.apache.hadoop.conf.Configuration;
import org.apache.hadoop.fs.Path;
import org.apache.parquet.example.data.Group;
import org.apache.parquet.example.data.simple.SimpleGroupFactory;
import org.apache.parquet.hadoop.ParquetWriter;
import org.apache.parquet.hadoop.example.GroupWriteSupport;
import org.apache.parquet.hadoop.metadata.CompressionCodecName;
import org.apache.parquet.schema.*;

import java.io.IOException;

/**
 * 示例程序:数据以 org.apache.parquet.example.data.Group 的形式写入Parquet文件
 */
public class WriteParquetDemoGroup {
    Configuration conf;

    public WriteParquetDemoGroup() {
        conf = new Configuration();
        conf.set("fs.hdfs.impl",
                org.apache.hadoop.hdfs.DistributedFileSystem.class.getName()
        );
        conf.set("fs.file.impl",
                org.apache.hadoop.fs.LocalFileSystem.class.getName()
        );
    }

    public void writeParquet(int numRows, String[] fields, Path parquetPath) throws IOException {

        Types.MessageTypeBuilder schemaBuilder = Types.buildMessage();
        for (int j = 0; j < fields.length; j++) {
            schemaBuilder.addField(new PrimitiveType(Type.Repetition.REQUIRED, PrimitiveType.PrimitiveTypeName.INT32, fields[j]));
        }
        MessageType schema = schemaBuilder.named("record");

        GroupWriteSupport.setSchema(schema, conf);
        GroupWriteSupport writeSupport = new GroupWriteSupport();
        writeSupport.init(conf);

        ParquetWriter<Group> writer = null;
        try {
            writer = new ParquetWriter<Group>(parquetPath,
                    writeSupport,
                    CompressionCodecName.SNAPPY,
                    ParquetWriter.DEFAULT_BLOCK_SIZE, ParquetWriter.DEFAULT_PAGE_SIZE, ParquetWriter.DEFAULT_PAGE_SIZE,
                    ParquetWriter.DEFAULT_IS_DICTIONARY_ENABLED,
                    ParquetWriter.DEFAULT_IS_VALIDATING_ENABLED,
                    ParquetWriter.DEFAULT_WRITER_VERSION,
                    conf);

            for (int i = 0; i < numRows; i++) {
                Group group = new SimpleGroupFactory(schema).newGroup();
                for (int j = 0; j < fields.length; j++) {
                    group.add(fields[j], i * j);
                }
                writer.write(group);
            }
        } catch (IOException e) {
            e.printStackTrace();
        } finally {
            if (writer != null) {
                try {
                    writer.close();
                } catch (IOException e) {
                    e.printStackTrace();
                }
            }
        }

    }
}

三、从Parquet文件读取数据

读取Parquet文件的代码本身很简单,只是要特别注意一点,为了能发挥Parquet列式存储的优势,应将要读取的列配置到PARQUET_READ_SCHEMA参数,以便跳过其他不需要扫描的列,从而提高读取性能。

public void readParquetWithReadSchema(Path parquetPath, String[] queryFields) throws IOException {
    // 将要读取的列配置到PARQUET_READ_SCHEMA,如果缺失这一步读取性能将严重降低
    Types.MessageTypeBuilder builder = Types.buildMessage();
    for (int j = 0; j < queryFields.length; j++) {
        builder.addField(new PrimitiveType(Type.Repetition.REQUIRED, PrimitiveType.PrimitiveTypeName.INT32, queryFields[j]));
    }
    MessageType messageType = builder.named("record");
    conf.set(ReadSupport.PARQUET_READ_SCHEMA, messageType.toString());

    // 读取Parquet文件
    GroupReadSupport readSupport = new GroupReadSupport();
    ParquetReader.Builder<Group> readerBuilder = ParquetReader.builder(readSupport, parquetPath);
    ParquetReader<Group> reader = readerBuilder.withConf(conf).build();
    Group line = null;
    while ((line = reader.read()) != null) {
        for (String field : queryFields) {
            line.getInteger(field, 0);
        }
    }
}

四、性能测试

写了一个简单的测试用例ParquetDemoTest,验证不同条件下上面的代码写入和读取Parquet文件的耗时。运行环境是普通笔记本电脑,i5 CPU + SSD硬盘。

写入性能:固定每行500列,可以看到写入parquet文件的耗时与写入的行数成正比;

读取性能:从parquet文件中读取少量列时速度是很快的,读取耗时与读取的列数成正比;

错误读取:当没有配置PARQUET_READ_SCHEMA时,读取多少列耗时都与读取500列差不多,未能体现列式存储的优势。

写入Parquet文件(Group), 100 行 x 500 列, 耗时 1580 ms
写入Parquet文件(Group), 500 行 x 500 列, 耗时 6927 ms
写入Parquet文件(Group), 1000 行 x 500 列, 耗时 12424 ms
写入Parquet文件(Group), 2000 行 x 500 列, 耗时 25849 ms
写入Parquet文件(Group), 3000 行 x 500 列, 耗时 36799 ms

读取Parquet文件(过滤列), 3000 行 x 5 列, 耗时 180 ms
读取Parquet文件(过滤列), 3000 行 x 10 列, 耗时 202 ms
读取Parquet文件(过滤列), 3000 行 x 15 列, 耗时 171 ms
读取Parquet文件(过滤列), 3000 行 x 50 列, 耗时 258 ms
读取Parquet文件(过滤列), 3000 行 x 100 列, 耗时 504 ms
读取Parquet文件(过滤列), 3000 行 x 200 列, 耗时 1608 ms
读取Parquet文件(过滤列), 3000 行 x 300 列, 耗时 2544 ms
读取Parquet文件(过滤列), 3000 行 x 400 列, 耗时 3998 ms
读取Parquet文件(过滤列), 3000 行 x 500 列, 耗时 6022 ms

读取Parquet文件(未过滤列), 3000 行 x 5 列, 耗时 6188 ms
读取Parquet文件(未过滤列), 3000 行 x 5 列, 耗时 6795 ms
读取Parquet文件(未过滤列), 3000 行 x 10 列, 耗时 6717 ms
读取Parquet文件(未过滤列), 3000 行 x 15 列, 耗时 6268 ms
读取Parquet文件(未过滤列), 3000 行 x 50 列, 耗时 6311 ms
读取Parquet文件(未过滤列), 3000 行 x 100 列, 耗时 7317 ms
读取Parquet文件(未过滤列), 3000 行 x 200 列, 耗时 6637 ms
读取Parquet文件(未过滤列), 3000 行 x 300 列, 耗时 6676 ms
读取Parquet文件(未过滤列), 3000 行 x 400 列, 耗时 7225 ms
读取Parquet文件(未过滤列), 3000 行 x 500 列, 耗时 6928 ms

五、代码下载

文中使用的代码:parquet-demo-1.0.0-src.zip

参考资料

https://www.arm64.ca/post/reading-parquet-files-java/

JSF开发问题和解决

file

本文记录使用Java Server Faces开发web应用过程中遇到的问题和解决方法。

1、在<f:subview>里的<h:commandLink>的action不执行

很多时候<f:subview>是在包含页面的情况下被用到(例如包含一个导航页面),而被包含的页面里如果有非JSF标签(如<a>)的时候,必须额外使用<f:verbatim>包含它才不会报错。问题是<f:verbatim>包含的内容是不算在JSF的Component Tree里的,因此这里的<h:commandLink>的action就不会被执行了。解决的办法是不要在<f:verbatim>里用<h:commandLink>,即尽量全部使用JSF的标签比较不容易出问题。参考链接

2、还是在<f:subview>里,action属性的方法虽然执行了,但不能转到faces-config里定义的目标页面

检查faces-config.xml<from-view-id>,如果页面被包含的话,则<from-view-id>可能应为/*,而不是如/navigatorbar.jspx这样。

3、结合EMF使用时,页面抛出找不到属性异常Error getting property 'xxx' from bean of type XXXX

EMF生成的XXXImpl里的构造方法是protected修饰的,改为public即可。(注意修改@generated修饰,否则下次重新生成时会被覆盖回来)

另(不仅限于EMF的情况):如果一个Bean里有两个同名但参数不同的方法,例如Customer有getRecords()getRecords(int year)这两个方法,则在JSF页面里用#{customer.value}会抛出同样的异常,我暂时还不确定是EL的问题还是JSF实现(我用的trinidad)的问题,部分异常stack如下所示:

严重: Servlet.service() for servlet faces threw exception
javax.faces.el.PropertyNotFoundException: Error getting property 'xxx' from bean of type XXXX
    at com.sun.faces.el.PropertyResolverImpl.getValue(PropertyResolverImpl.java:107)
    at com.sun.faces.el.impl.ArraySuffix.evaluate(ArraySuffix.java:167)
    at com.sun.faces.el.impl.ComplexValue.evaluate(ComplexValue.java:151)
    at com.sun.faces.el.impl.ExpressionEvaluatorImpl.evaluate(ExpressionEvaluatorImpl.java:243)
    at com.sun.faces.el.ValueBindingImpl.getValue(ValueBindingImpl.java:173)
    at com.sun.faces.el.ValueBindingImpl.getValue(ValueBindingImpl.java:154)
    at org.apache.myfaces.trinidad.bean.FacesBeanImpl.getProperty(FacesBeanImpl.java:66)
    at org.apache.myfaces.trinidad.component.UIXComponentBase.getProperty(UIXComponentBase.java:1100)
    at org.apache.myfaces.trinidad.component.UIXIterator.getValue(UIXIterator.java:415)
    at org.apache.myfaces.trinidad.component.UIXCollection._flushCachedModel(UIXCollection.java:1127)
    at org.apache.myfaces.trinidad.component.UIXCollection.encodeBegin(UIXCollection.java:511)
    at org.apache.myfaces.trinidadinternal.uinode.UIComponentUINode._renderComponent(UIComponentUINode.java:317)
    at org.apache.myfaces.trinidadinternal.uinode.UIComponentUINode.render(UIComponentUINode.java:279)

解决的办法是把带参数的那个方法改名。

4、从session里删除一个bean

ValueBinding binding =FacesContext.getCurrentInstance().getApplication().createValueBinding("#{MyBean}");
binding.setValue(context, null);

参考链接

搬家前链接:https://www.cnblogs.com/bjzhanghao/archive/2009/02/19/1394275.html

用Java制作动画效果

用Java画动画很简单,让一个线程自己定时调用自己即可,记得要设置一个退出(结束)条件。

import org.eclipse.swt.SWT;
import org.eclipse.swt.layout.FillLayout;
import org.eclipse.swt.widgets.Display;
import org.eclipse.swt.widgets.Shell;
import org.eclipse.swt.widgets.Text;

public class Animation {
    final static int DELAY = 500;

    public static void main(String[] args) {
        final Display display = new Display();
        final Shell shell = new Shell(display);
        shell.setLayout(new FillLayout());
        final Text text = new Text(shell, SWT.BORDER);
        text.setText("0");
        new Runnable() {
            public void run() {
                if (shell.isDisposed())
                    return;
                text.setText("" + (Integer.parseInt(text.getText()) + 1));
                Display.getDefault().timerExec(DELAY, this);
            }
        }.run();

        shell.pack();
        shell.open();
        while (!shell.isDisposed()) {
            if (!display.readAndDispatch())
                display.sleep();
        }
        display.dispose();
    }
}

运行结果:

file

可以看到窗口中显示的数字不停增长。

搬家前链接:https://www.cnblogs.com/bjzhanghao/archive/2007/03/30/694268.html

使用Java JNI的步骤

  1. 写Java类,其中定义了native方法
public class WitWrapper {

    static {
        System.loadLibrary("witengine");
    }

    /**
     * @param args
     */
    public static void main(String[] args) {
        new WitWrapper().run();
    }

    private void run() {
        solve("C:\\temp\\witlib\\problem.txt");
    }

    public native static int solve(String filename);
}
  1. 在命令行下用javah生成.h文件,内容如下:
/* DO NOT EDIT THIS FILE - it is machine generated */
#include <jni.h>
/* Header for class XXX_WitWrapper */

#ifndef _Included_XXX_witwrapper_WitWrapper
#define _Included_XXX_witwrapper_WitWrapper
#ifdef __cplusplus
extern "C" {
#endif
/*
 * Class:     XXX_WitWrapper
 * Method:    solve
 * Signature: (Ljava/lang/String;)I
 */
JNIEXPORT jint JNICALL Java_XXX_WitWrapper_solve
  (JNIEnv *, jclass, jstring);

#ifdef __cplusplus
}
#endif
#endif 
  1. 复制.h文件到一个vc++6.0的dll工程里,用vs2005得到的dll会依赖msvcr80d.dll等其他dll,不建议。把$jdk_dir$/include里的jni.h和$jdk_dir$/include/win32里的jni_md.h也添加到这个工程里。

  2. 按.h文件实现.c文件对应的方法,如下例,注意jstring类型要转换成char *类型,否则即使英文也会有乱码:

/**************************************************************************** 
 *
 * Sample WIT API Program.
 * Runs implosion on the Diner problem.
 *
 ****************************************************************************/
#include <stdlib.h>
#include "wit.h"
#include "jni.h"

/****************************************************************************/
/* Main Program                                                             */
/****************************************************************************/
JNIEXPORT jint JNICALL Java_XXX_WitWrapper_solve
  (JNIEnv * env, jclass jc, jstring file)
{
  WitRun * theWitRun;
  const char *str = (*env)->GetStringUTFChars(env, file, 0);//把jstring转换为char *,否则会有错
  printf(str);

   /* Initialize WIT */
   witNewRun( &theWitRun );
   witInitialize ( theWitRun );

   witReadData (theWitRun, str);
   /*************************************************************************
    *
    * Finished entering data
    *
    ************************************************************************/

   witOptImplode( theWitRun );
   witWriteExecSched( theWitRun, "execsched.txt", WitBSV );
   witWriteShipSched( theWitRun, "shipsched.txt", WitBSV );

   witDeleteRun( theWitRun );

   exit (0);

} /* main */
  1. 编译生成.dll文件,把它和其他依赖的文件放在path环境变量包含的一个目录下,在java里就可以调用了。注意调用这个dll的java类名(包括所在包)不能改,否则会出现UnsatisfiedLinkException,如果一定要改名,只能重新生成一遍dll了。

搬家前链接:https://www.cnblogs.com/bjzhanghao/archive/2007/03/30/693889.html

用JFreeChart画仪表盘

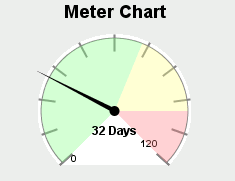
JFreeChart画仪表盘(Speedo Meter Chart)的例子:

DefaultValueDataset data = new DefaultValueDataset(32.0);
MeterPlot plot = new MeterPlot(data);
plot.setDialShape(DialShape.CHORD);
plot.setDialBackgroundPaint(Color.WHITE);
plot.setRange(new Range(0, 120));
plot.setDialOutlinePaint(Color.GRAY);
plot.setNeedlePaint(Color.BLACK);
plot.setTickLabelsVisible(true);
plot.setTickLabelPaint(Color.BLACK);
plot.setTickPaint(Color.GRAY);
plot.setTickLabelFormat(NumberFormat.getNumberInstance());
plot.setTickSize(10);
plot.setValuePaint(Color.BLACK);
plot.addInterval(new MeterInterval("Low", new Range(0, 70), null, null,new Color(128, 255, 128,90) ));
plot.addInterval(new MeterInterval("Normal", new Range(70, 100), null, null, new Color(255, 255, 128,90)));
plot.addInterval(new MeterInterval("High", new Range(100, 120), null, null, new Color(255, 128, 128,90)));

//创建chart,最后一个参数决定是否显示图例
final JFreeChart chart = new JFreeChart("Meter Chart", JFreeChart.DEFAULT_TITLE_FONT, plot, false);

//放到SWT的Composite里,以前介绍过这个方法
Composite drawarea = new Composite(tabFolder, SWT.EMBEDDED);
drawarea.setLayout(new FillLayout());
Frame canvasFrame = SWT_AWT.new_Frame(drawarea);
java.awt.Canvas canvas = new java.awt.Canvas() {
    public void paint(Graphics g) {
        super.paint(g);
        if (chart != null)
            chart.draw((Graphics2D) g, getBounds());
    }
};
TabItem tab = new TabItem(tabFolder, SWT.NONE);
tab.setControl(drawarea);
tab.setText("Meter");
canvasFrame.add(canvas);

运行效果:

file

搬家前链接:https://www.cnblogs.com/bjzhanghao/archive/2007/03/13/673303.html

让URLConnection使用代理服务器

JDK的文档对使用代理服务器的介绍很少,据说JDK5.0好象增加了这方面的内容。其实要使用代理服务器很简单,只要在URL.openConnection()之前增加下面的代码即可:

Properties prop = System.getProperties(); 
prop.put("http.proxyHost", getProxyHost()); 
prop.put("http.proxyPort", "" + getProxyPort());

也就是给系统变量里增加了两个项,在执行程序时加上参数“-Dhttp.proxyHost=xxx”的效果也是一样的。

若代理服务器需要验证,则还要使用以下代码:

String authentication = getProxyUser() + ":" + getProxyPassword(); 
String encodedLogin = new sun.misc.BASE64Encoder().encodeBuffer(authentication.getBytes()); 
connection.setRequestProperty("Proxy-Authorization", "Basic " + encodedLogin);

也就是在Http头上增加了Proxy-Authorization信息。

更多属性:http://java.sun.com/j2se/1.4.2/docs/guide/net/properties.html

搬家前链接:https://www.cnblogs.com/bjzhanghao/archive/2005/01/11/90236.html

用正则表达式处理含中文字符串的问题

已经是第二次遇到同样的问题了,要匹配的字符串里含有中文,例如“<你好><Edward>”,我希望取出Edward的名字,所以正则表达式为“<[^>]><([^>])>”,匹配后只要取group(1)即可。在一台装有jdk1.4.2_06国际版的机器上,运行正常,但在装jdk1.4.2_01的机器上,则完全不能匹配。卸载原来的jdk,换成1.4.2_06版就没有问题了。

为什么会有这个区别呢,我试了增加各种参数例如-Duser.language=zh -Duser.region=cn -Dfile.encoding=GBK都没有用,难道我的程序要求用户机器上必须装最新的jdk1.4?但据我所知,还有很多机器上装的是jdk1.4.0呢,更别说jdk5.0了。

时间关系,这个问题暂时放在这里,欢迎提供解决方法。

搬家前链接:https://www.cnblogs.com/bjzhanghao/archive/2005/01/07/88414.html

表单提交方式由POST改为GET出现乱码的解决

组合查询功能,原先使用<html:form>缺省是以POST方式提交的,增加了分页功能后,由于要在URL里记住用户提交的查询内容,例如:

http://localhost:8080/aims/client/filter.do?name=%E5%BC%A0&address=%E5%8C%97%E4%BA%AC&title=&duty=&departmentCode=10000001&categoryCode=10000002&fieldCode=10000006&genderCode=&identityCode](http://localhost:8080/aims/client/filter.do?name=%E5%BC%A0&address=%E5%8C%97%E4%BA%AC&title=&duty=&departmentCode=10000001&categoryCode=10000002&fieldCode=10000006&genderCode=&identityCode)=

所以表单的提交方式要改为GET。

只是简单的改为method="GET",但这样一改却让action无法得到正确的输入值,例如用户在姓名条件里输入,在action里用theForm.getName()会得到形如%A4的乱码,不仅查询结果是错误的,而且在重新显示的查询表单的姓名栏里也显示出乱码。

我试了很多种转码也没转成原来的值,问了很多朋友,最后的解决方式还是通过转换编码,是把ISO8859-1转为UTF-8,即:

String name=new String(theForm.getName().getBytes("ISO8859-1"),"UTF-8");

注意我的应用程序里已使用了encoding为UTF-8的Filter。

虽然要加手工转码的代码很不爽,但只在这一处而已,也不碍大事。只是我现在的环境是Tomcat+Mysql,不知道换到其他服务器上会不会重新出现乱码问题,好在这个项目不需要考虑这个问题。

据说Tomcat处理POST和GET的请求时处理编码的方式不太一样,我还看到有篇帖子说要在server.xml<Connector>里加URIEncoding="GBK"属性,但我试了不起丝毫作用。

搬家前链接:https://www.cnblogs.com/bjzhanghao/archive/2004/12/14/77129.html