利用OSGi DS实现可配置Web应用程序初探

Eclipse的插件体系结构让我们可以灵活定义插件,组装成可插拔的软件系统,OSGi的Declarative Services(DS)有着和Eclipse扩展点类似的思想(见很详细的一篇对比文章),很自然的想到,如果把DS应用在Web应用程序上,我们将能够通过定义自己的“扩展点”,打造SOA的Web应用程序。题目中“可配置”是指,根据用户需求,提供给客户不同的包即可形成针对该客户定制的产品/解决方案。

现在来试试怎样用DS实现动态配置一个Web应用程序界面里菜单,使用的OSGi实现还是Equinox。Eclipse里菜单项是通过实现actionSets、editorActions等等扩展点添加的,在OSGi里没有这些“扩展点”,没关系,我们可以自己定义。

一、用一个Bundle定义Java接口文件,和Eclipse扩展点的功能类似,这些接口可以作为服务的接入点。例子里这个Bundle的ID是net.bjzhanghao.osgi.services,接口类是IMenuContributor,内容很简单如下所示:

public interface IMenuContributor {
    public List<MenuItem> getItems();
}

上面用到的MenuItem是自己定义的一个简单的数据结构,包含name和url两个String类型的成员变量和相应的getter/setter方法,这里就不展示了。

二、用0..n个Bundle实现上面定义的接口(暂时称之为Contributor),并声明为服务。例子里有两个这样的Bundle,ID分别是net.bjzhanghao.osgi.menu.contributor和net.bjzhanghao.osgi.menu.contributor2,实现类都是MyMenuContributor,前者提供了Menu1..3,后者提供了Menu4..5;以下是服务的声明,即项目里OSGI-INF/component.xml文件的内容:

<?xml version="1.0" encoding="UTF-8"?>
<component name="services">
    <implementation 
        class="net.bjzhanghao.osgi.menu.contributor.MyMenuContributor"/> 
    <service>
        <provide interface="net.bjzhanghao.osgi.services.IMenuContributor"/>
    </service>
</component>

MyMenuContributor实现IMenuContributor,你可以任意实现它,例子里是让它提供三个菜单项:

public class MyMenuContributor implements IMenuContributor {
    public List<MenuItem> getItems() {
        List<MenuItem> list = new ArrayList<MenuItem>();
        list.add(new MenuItem("Menu1", null));
        list.add(new MenuItem("Menu2", null));
        list.add(new MenuItem("Menu3", null));
        return list;
    }
}

三、现在SOA的一半工作也就是注册服务的部分完成了,剩下要做的是另一半,消费这些服务。首先在web应用程序Bundle里,创建一个Helper类收集这些服务,这个Helper类的功能相当于一个Registry。例子里这个Bundle的ID是net.bjzhanghao.osgi.example,Helper类是MenuHelper;以下是对MenuHelper的配置,即项目里OSGI-INF/component.xml文件的内容,这样OSGi在启动Bundle时会把实现IMenuContributor的服务通过addMenuContributor方法注册到MenuHelper里,注意cardinality的值要为"0..n",policy的值要为"dynamic":

<?xml version="1.0" encoding="UTF-8"?>
<component name="menuHelper">
    <implementation     
        class="net.bjzhanghao.osgi.example.MenuHelper"/>   
    <reference name="menuHelper"
        interface="net.bjzhanghao.osgi.services.IMenuContributor"
        cardinality="0..n"
        policy="dynamic"
        bind="addMenuContributor"
        unbind="removeMenuContributor"
    />
</component>

四、在JSP/Servlet里,利用上面的Helper类构造界面(或业务逻辑)。因为我们定义的接口是关于菜单的,所以例子应用的菜单会根据Bundle配置(启动/停止)变化。例子里是在ExampleServlet里实现的,代码很简单如下所示:

protected void doGet(HttpServletRequest req, HttpServletResponse resp) throws ServletException, IOException {
    resp.setContentType("text/html");
    resp.getWriter().write("Hello<br/>");
    resp.getWriter().write("<ul>");
    for (IMenuContributor menuContributor : MenuHelper.getInstance().getMenuContributors()) {
        for (MenuItem mItem : menuContributor.getItems()) {
            resp.getWriter().write("<li><a href=\"" + mItem.getUrl() + "\">" + mItem.getName() + "</a></li>");
        }
    }
    resp.getWriter().write("</ul>");
}

五、执行方式:

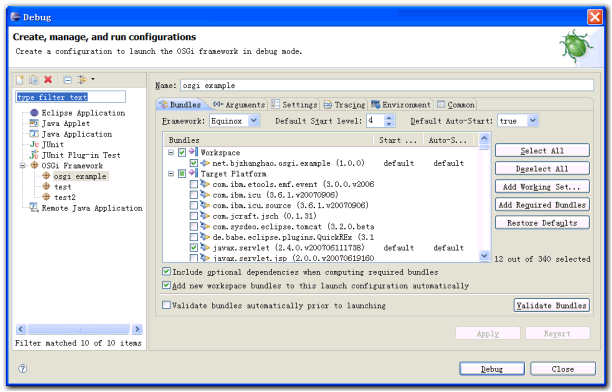
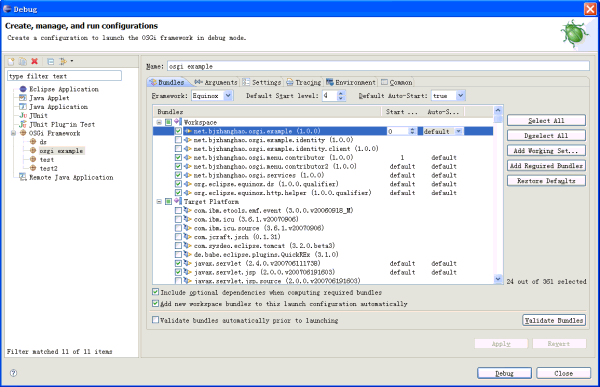
1、在Eclipse里导入代码包里所有项目,启动上述所有项目及其依赖的项目(Add Required Bundles),见下图:

file

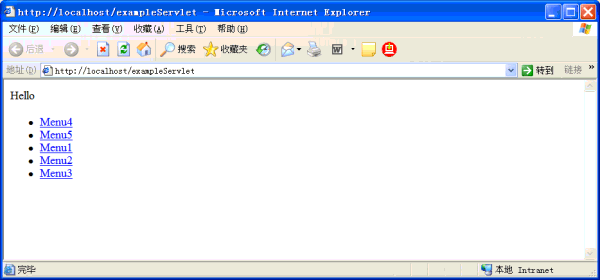
2、在浏览器里输入地址http://localhost/exampleServlet,应该可以看到五个菜单项,见下图(这个简单的例子里没有考虑顺序问题,所以Menu4..5可能出现在前面,使用类似Eclipse里为Menu预留位置的方式可以解决):

file

3、回到Eclipse,在Console里输入ss查看当前的Bundle,应该可以看到类似下图的内容:

file

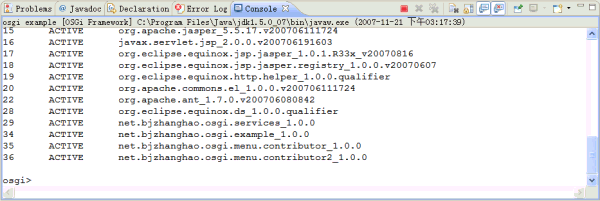
4、在Console里输入stop 35(35是Contributor的Bundle序号),Console会提示“Calling removeMenuContributor”,然后到浏览器里刷新页面,应该看到菜单项只剩下Menu4..5。

file

代码下载

搬家前链接:https://www.cnblogs.com/bjzhanghao/archive/2007/11/21/967320.html

Equinox OSGi服务器应用程序的配置步骤

file

本文介绍在Eclipse里如何配置一个简单的基于Eclipse Equinox OSGi实现的Web应用程序,在它的基础上可以构造更加复杂的应用,本文使用的是Eclipse 3.3.1版本,如果你的Eclipse版本在3.2.0或以上应该都可以。

一、支持静态页面和Servlet

  1. 创建一个新的plugin项目, net.bjzhanghao.osgi.test,在向导第一步里选中“This plug-in is target,在下一步的“Plug-in Options”里选中“Generate an activator”。

file

  1. 在例子项目的MANIFEST.MF里添加如下依赖项目,这些项目都是Eclipse自带的:
org.eclipse.equinox.http.jetty
org.eclipse.equinox.http.servlet
org.mortbay.jetty
org.apache.commons.logging
javax.servlet
org.eclipse.equinox.http.registry
  1. 在例子项目根目录下创建一个放置web文件的目录,如“web_files”,在这个目录下写一个简单的index.html文件。

  2. 为项目建一个plugin.xml文件,内容如下:

<plugin>
  <extension point="org.eclipse.equinox.http.registry.resources">
    <resource alias="/web" base-name="/web_files"/>
  </extension>
</plugin>

注意,这时若MANIFEST.MF里提示错误,只要在Bundle-SymbolicName这一行后面加上;singleton:=true即可解决。

  1. 现在可以启动这个应用程序了。在Eclipse菜单里选择Run->Open Run Dialog...,在左边的 OSGi Framework项下创建一个新的启动配置项,在右边先点Deselect All清空所有复选框,然后在Workspace下选中 自己的osgi项目,再点Add Required Bundles按钮,Eclipse会自动把所依赖的项目选中。 最后按Debug按钮启动,内嵌的jetty和我们的项目会一起被启动。

file

  1. 打开浏览器,输入 http://localhost/web/index.html 应该可以看到index.html里的内容。

以上只验证了静态页面,现在来配置一个servlet看看。

  1. 在项目里创建一个继承自HttpServlet的类,覆盖doGet()方法,内容是在网页上打印一些文本。

  2. 在项目的plugin.xml里添加下面的内容,这些内容指定了servlet的访问路径和实现类:

<extension point="org.eclipse.equinox.http.registry.servlets">
    <servlet
      alias="/exampleServlet"
      class="net.bjzhanghao.osgi.example.servlet.ExampleServlet"/>
</extension>
  1. 重新启动项目,在浏览器里输入 http://localhost/exampleServlet ,应该可以看到servlet的输出。

二、支持JSP页面

  1. 在index.html所在目录下创建一个简单的jsp文件index.jsp

  2. 打开项目的MANIFEST.MF文件,添加如下项目依赖:

org.eclipse.equinox.jsp.jasper,
org.apache.jasper,
org.eclipse.equinox.jsp.jasper.registry,
javax.servlet.jsp,
org.apache.commons.el,
org.eclipse.equinox.http.helper,
org.eclipse.osgi,
org.eclipse.osgi.services

其中org.eclipse.equinox.http.helper需要从cvs里下载得到(目前是在/cvsroot/eclipse下的 equinox-incubator目录里,以后可能会直接放到/cvsroot/eclipse下)。

  1. 修改Activator,目的是注册一个处理扩展名为.jsp类型的servlet,感觉这一步以后应该有更简单的方法,例如通过扩展点。
public class Activator implements BundleActivator {

    private ServiceTracker httpServiceTracker;

    String jspContext = "/jsps";
    String jspFolder = "/web_files";

    public void start(BundleContext context) throws Exception {
        httpServiceTracker = new HttpServiceTracker(context);
        httpServiceTracker.open();
    }

    public void stop(BundleContext context) throws Exception {
        httpServiceTracker.open();
    }

    private class HttpServiceTracker extends ServiceTracker {

        public HttpServiceTracker(BundleContext context) {
            super(context, HttpService.class.getName(), null);
        }

        public Object addingService(ServiceReference reference) {
            final HttpService httpService = (HttpService) context
                    .getService(reference);
            try {
                HttpContext commonContext = new BundleEntryHttpContext(context
                        .getBundle(), jspFolder);
                httpService.registerResources(jspContext, "/", commonContext);

                Servlet adaptedJspServlet = new ContextPathServletAdaptor(
                        new JspServlet(context.getBundle(), jspFolder),
                        jspContext);
                httpService.registerServlet(jspContext + "/*.jsp",
                        adaptedJspServlet, null, commonContext);
            } catch (Exception e) {
                e.printStackTrace();
            }
            return httpService;
        }

        public void removedService(ServiceReference reference, Object service) {
            final HttpService httpService = (HttpService) service;
            httpService.unregister(jspContext);
            httpService.unregister(jspContext + "/*.jsp");
            super.removedService(reference, service);
        }
    }
}
  1. 打开Debug对话框,选中workspace里的例子osgi项目和org.eclipse.equinox.http.helper项目,再按Add Required Bundles按钮,然后启动程序。

  2. 在浏览器里输入 http://localhost/jsps/index.jsp ,应该可以看到jsp输出。

例子项目源代码下载(链接)。

参考链接:

Embedding an HTTP server in Equinox
Writing a bundle-based server application
OSGi based JSP Support

搬家前链接:https://www.cnblogs.com/bjzhanghao/archive/2007/10/28/940622.html