一次Eclipse发生内存溢出(ADT环境,多打开几个xml文件内存占用就会飚升),强制结束任务,再次启动Eclipse发现闪退。
标签: eclipse
SWT里的GridLayoutFactory和GridDataFactory布局
我写的SWT程序里用到layout的地方大部分都是GridLayout,今天才发现原来从eclipse 3.2开始就有了这两个方便使的类:GridLayoutFactory和GridDataFactory。特别是GridDataFactory,以前要用至少三行的代码:
GridData gd = new GridData(GridData.FILL_HORIZONTAL);
gd.horizontalSpan = 2;
txtName.setLayoutData(gd);
现在用一行就可以了(稍微长点儿):
GridDataFactory.fillDefaults().grab(true, false).span(2, 1).applyTo(txtName);或者有些情况下更简单:
GridDataFactory.generate(txtName, 2, 1);顺便提一句:eclipse.org上关于SWT的例子在http://www.eclipse.org/swt/snippets就有很多,而JFace的例子则可以在这个地址(2015/10/20更新,JFace Snippets)找到(或者从cvs里下载)。
搬家前链接:https://www.cnblogs.com/bjzhanghao/archive/2008/12/09/1350938.html
启用EMF的自动生成UUID功能
缺省条件下,EMF不会为每个对象维护一个唯一的id,这在一些情况下不太方便,例如要在web环境下编辑一个EMF模型实例,通常需要在URL里传递对象的id以便确定目标。
有两种方式解决这类问题。第一种是在模型里给每个对象增加一个id属性,并维护使其保持唯一,例如在XXXFactory的createXXX()方法里为这个属性赋值。
另一种方式是借助EMF的功能。其实EMF的XMIResource维护了一个id与对象的映射表,并且会为每个新创建的对象自动赋值,只要稍微设置一下就可以启用这个功能,具体的方法如下。
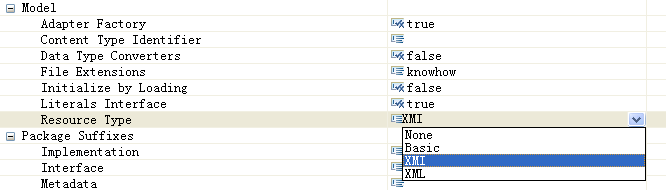
- 在
xxx.genmodel里选中package节点,在属性视图里把Resource Type属性的值设置为XMI。
-
重新生成代码,EMF生成的代码里会比原来多出
XXXResourceImpl.java文件。 -
在
XXXResourceImpl.java里,覆盖useUUIDs()方法,让其返回true(缺省返回的是false)。 -
重新生成代码。(删除以前的
Manifest.MF和plugin.xml文件以便这两个文件能得到更新)
这样,如果用文本方式查看新创建的模型实例文件,会发现每个对象都多出一个xmi:id属性,如xmi:id="_gitpslkoEd2PdI7FPnuunA"。要在程序里使用这个id,只需要用resource.getId(eobject)即可得到,其中resource可以通过eobject.eResource()很方便的获得。
参考链接
How To Enable UUID In EMF Generated Model To Get Copy&Paste Working
这个链接里的方法太麻烦了,但功效一样。
Eclipse GMF - Enabling UUIDs in Semantic model - The Simplest Way
用GMF的时候这个链接里的方法应该比较方便
Eclipse 3.4新特性 – Plug-in spy
Eclipse 3.4提供了一个新功能:在任何界面下按Alt+Shift+F1 (Windows, Mac OS里用Shift+Option+F1),就可以看到Eclipse用来实现当前选中界面元素的类。
这个功能至少我看起来对插件开发人员很有用,因为当你想要模仿实现(或利用)Eclipse里的某个界面时,不用再像以前那样猜这个界面的实现类的名字了。比如最开始我就用了很久才找到属性视图的实现类是PropertySheet,而我总是朝着PropertyView的方向找,当然很难找到。
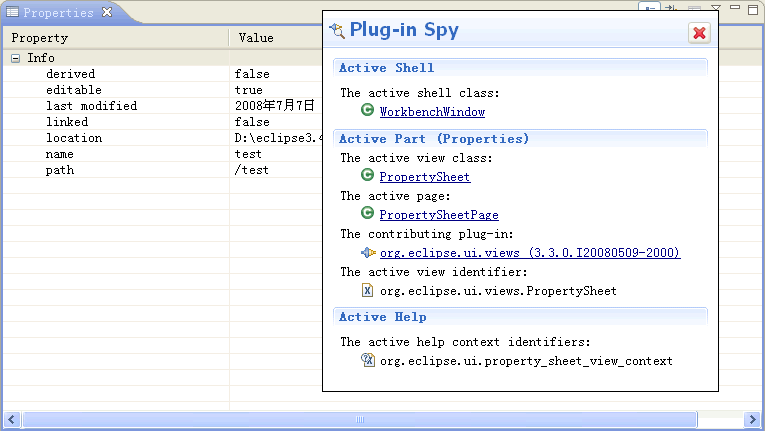
Plug-in Spy本是一个单独的小项目,在3.4里直接集成到workbench里了。
利用OSGi DS实现可配置Web应用程序初探
Eclipse的插件体系结构让我们可以灵活定义插件,组装成可插拔的软件系统,OSGi的Declarative Services(DS)有着和Eclipse扩展点类似的思想(见很详细的一篇对比文章),很自然的想到,如果把DS应用在Web应用程序上,我们将能够通过定义自己的“扩展点”,打造SOA的Web应用程序。题目中“可配置”是指,根据用户需求,提供给客户不同的包即可形成针对该客户定制的产品/解决方案。
现在来试试怎样用DS实现动态配置一个Web应用程序界面里菜单,使用的OSGi实现还是Equinox。Eclipse里菜单项是通过实现actionSets、editorActions等等扩展点添加的,在OSGi里没有这些“扩展点”,没关系,我们可以自己定义。
一、用一个Bundle定义Java接口文件,和Eclipse扩展点的功能类似,这些接口可以作为服务的接入点。例子里这个Bundle的ID是net.bjzhanghao.osgi.services,接口类是IMenuContributor,内容很简单如下所示:
public interface IMenuContributor {
    public List<MenuItem> getItems();
}
上面用到的MenuItem是自己定义的一个简单的数据结构,包含name和url两个String类型的成员变量和相应的getter/setter方法,这里就不展示了。
二、用0..n个Bundle实现上面定义的接口(暂时称之为Contributor),并声明为服务。例子里有两个这样的Bundle,ID分别是net.bjzhanghao.osgi.menu.contributor和net.bjzhanghao.osgi.menu.contributor2,实现类都是MyMenuContributor,前者提供了Menu1..3,后者提供了Menu4..5;以下是服务的声明,即项目里OSGI-INF/component.xml文件的内容:
<?xml version="1.0" encoding="UTF-8"?>
<component name="services">
    <implementation
        class="net.bjzhanghao.osgi.menu.contributor.MyMenuContributor"/>
    <service>
        <provide interface="net.bjzhanghao.osgi.services.IMenuContributor"/>
    </service>
</component>
MyMenuContributor实现IMenuContributor,你可以任意实现它,例子里是让它提供三个菜单项:
public class MyMenuContributor implements IMenuContributor {
    public List<MenuItem> getItems() {
        List<MenuItem> list = new ArrayList<MenuItem>();
        list.add(new MenuItem("Menu1", null));
        list.add(new MenuItem("Menu2", null));
        list.add(new MenuItem("Menu3", null));
        return list;
    }
}
三、现在SOA的一半工作也就是注册服务的部分完成了,剩下要做的是另一半,消费这些服务。首先在web应用程序Bundle里,创建一个Helper类收集这些服务,这个Helper类的功能相当于一个Registry。例子里这个Bundle的ID是net.bjzhanghao.osgi.example,Helper类是MenuHelper;以下是对MenuHelper的配置,即项目里OSGI-INF/component.xml文件的内容,这样OSGi在启动Bundle时会把实现IMenuContributor的服务通过addMenuContributor方法注册到MenuHelper里,注意cardinality的值要为"0..n",policy的值要为"dynamic":
<?xml version="1.0" encoding="UTF-8"?>
<component name="menuHelper">
    <implementation
        class="net.bjzhanghao.osgi.example.MenuHelper"/>
    <reference name="menuHelper"
        interface="net.bjzhanghao.osgi.services.IMenuContributor"
        cardinality="0..n"
        policy="dynamic"
        bind="addMenuContributor"
        unbind="removeMenuContributor"
    />
</component>
四、在JSP/Servlet里,利用上面的Helper类构造界面(或业务逻辑)。因为我们定义的接口是关于菜单的,所以例子应用的菜单会根据Bundle配置(启动/停止)变化。例子里是在ExampleServlet里实现的,代码很简单如下所示:
protected void doGet(HttpServletRequest req, HttpServletResponse resp) throws ServletException, IOException {
    resp.setContentType("text/html");
    resp.getWriter().write("Hello<br/>");
    resp.getWriter().write("<ul>");
    for (IMenuContributor menuContributor : MenuHelper.getInstance().getMenuContributors()) {
        for (MenuItem mItem : menuContributor.getItems()) {
            resp.getWriter().write("<li><a href=\"" + mItem.getUrl() + "\">" + mItem.getName() + "</a></li>");
        }
    }
    resp.getWriter().write("</ul>");
}
五、执行方式:
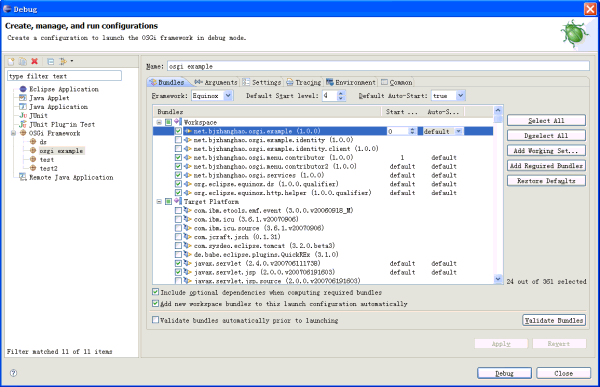
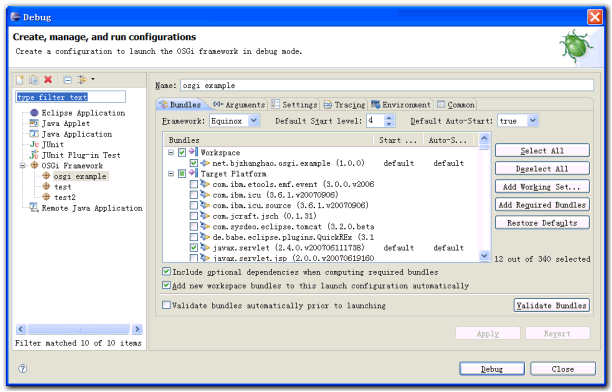
1、在Eclipse里导入代码包里所有项目,启动上述所有项目及其依赖的项目(Add Required Bundles),见下图:
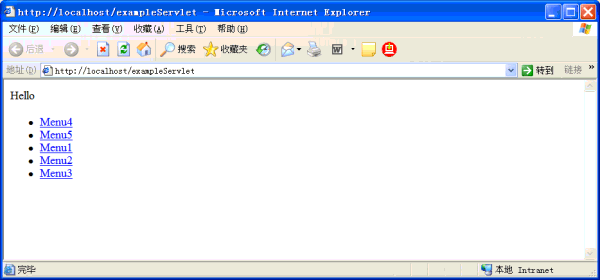
2、在浏览器里输入地址http://localhost/exampleServlet,应该可以看到五个菜单项,见下图(这个简单的例子里没有考虑顺序问题,所以Menu4..5可能出现在前面,使用类似Eclipse里为Menu预留位置的方式可以解决):
3、回到Eclipse,在Console里输入ss查看当前的Bundle,应该可以看到类似下图的内容:
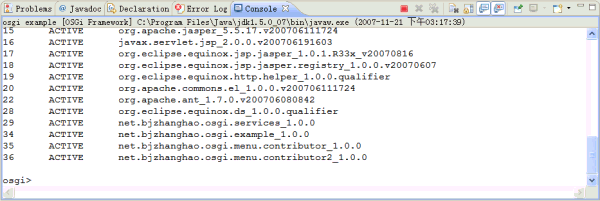
4、在Console里输入stop 35(35是Contributor的Bundle序号),Console会提示“Calling removeMenuContributor”,然后到浏览器里刷新页面,应该看到菜单项只剩下Menu4..5。

搬家前链接:https://www.cnblogs.com/bjzhanghao/archive/2007/11/21/967320.html
Equinox OSGi服务器应用程序的配置步骤

本文介绍在Eclipse里如何配置一个简单的基于Eclipse Equinox OSGi实现的Web应用程序,在它的基础上可以构造更加复杂的应用,本文使用的是Eclipse 3.3.1版本,如果你的Eclipse版本在3.2.0或以上应该都可以。
一、支持静态页面和Servlet
- 创建一个新的plugin项目, net.bjzhanghao.osgi.test,在向导第一步里选中“This plug-in is target,在下一步的“Plug-in Options”里选中“Generate an activator”。

- 在例子项目的MANIFEST.MF里添加如下依赖项目,这些项目都是Eclipse自带的:
org.eclipse.equinox.http.jetty
org.eclipse.equinox.http.servlet
org.mortbay.jetty
org.apache.commons.logging
javax.servlet
org.eclipse.equinox.http.registry-
在例子项目根目录下创建一个放置web文件的目录,如“web_files”,在这个目录下写一个简单的index.html文件。
-
为项目建一个plugin.xml文件,内容如下:
<plugin>
  <extension point="org.eclipse.equinox.http.registry.resources">
    <resource alias="/web" base-name="/web_files"/>
  </extension>
</plugin>注意,这时若MANIFEST.MF里提示错误,只要在Bundle-SymbolicName这一行后面加上;singleton:=true即可解决。
- 现在可以启动这个应用程序了。在Eclipse菜单里选择
Run->Open Run Dialog...,在左边的OSGi Framework项下创建一个新的启动配置项,在右边先点Deselect All清空所有复选框,然后在Workspace下选中 自己的osgi项目,再点Add Required Bundles按钮,Eclipse会自动把所依赖的项目选中。 最后按Debug按钮启动,内嵌的jetty和我们的项目会一起被启动。
- 打开浏览器,输入 http://localhost/web/index.html 应该可以看到index.html里的内容。
以上只验证了静态页面,现在来配置一个servlet看看。
-
在项目里创建一个继承自HttpServlet的类,覆盖doGet()方法,内容是在网页上打印一些文本。
-
在项目的plugin.xml里添加下面的内容,这些内容指定了servlet的访问路径和实现类:
<extension point="org.eclipse.equinox.http.registry.servlets">
    <servlet
      alias="/exampleServlet"
      class="net.bjzhanghao.osgi.example.servlet.ExampleServlet"/>
</extension>- 重新启动项目,在浏览器里输入 http://localhost/exampleServlet ,应该可以看到servlet的输出。
二、支持JSP页面
-
在index.html所在目录下创建一个简单的jsp文件index.jsp
-
打开项目的MANIFEST.MF文件,添加如下项目依赖:
org.eclipse.equinox.jsp.jasper,
org.apache.jasper,
org.eclipse.equinox.jsp.jasper.registry,
javax.servlet.jsp,
org.apache.commons.el,
org.eclipse.equinox.http.helper,
org.eclipse.osgi,
org.eclipse.osgi.services
其中org.eclipse.equinox.http.helper需要从cvs里下载得到(目前是在/cvsroot/eclipse下的 equinox-incubator目录里,以后可能会直接放到/cvsroot/eclipse下)。
- 修改Activator,目的是注册一个处理扩展名为.jsp类型的servlet,感觉这一步以后应该有更简单的方法,例如通过扩展点。
public class Activator implements BundleActivator {

    private ServiceTracker httpServiceTracker;

    String jspContext = "/jsps";
    String jspFolder = "/web_files";

    public void start(BundleContext context) throws Exception {
        httpServiceTracker = new HttpServiceTracker(context);
        httpServiceTracker.open();
    }

    public void stop(BundleContext context) throws Exception {
        httpServiceTracker.open();
    }

    private class HttpServiceTracker extends ServiceTracker {

        public HttpServiceTracker(BundleContext context) {
            super(context, HttpService.class.getName(), null);
        }

        public Object addingService(ServiceReference reference) {
            final HttpService httpService = (HttpService) context
                    .getService(reference);
            try {
                HttpContext commonContext = new BundleEntryHttpContext(context
                        .getBundle(), jspFolder);
                httpService.registerResources(jspContext, "/", commonContext);

                Servlet adaptedJspServlet = new ContextPathServletAdaptor(
                        new JspServlet(context.getBundle(), jspFolder),
                        jspContext);
                httpService.registerServlet(jspContext + "/*.jsp",
                        adaptedJspServlet, null, commonContext);
            } catch (Exception e) {
                e.printStackTrace();
            }
            return httpService;
        }

        public void removedService(ServiceReference reference, Object service) {
            final HttpService httpService = (HttpService) service;
            httpService.unregister(jspContext);
            httpService.unregister(jspContext + "/*.jsp");
            super.removedService(reference, service);
        }
    }
}-
打开Debug对话框,选中workspace里的例子osgi项目和org.eclipse.equinox.http.helper项目,再按
Add Required Bundles按钮,然后启动程序。 -
在浏览器里输入 http://localhost/jsps/index.jsp ,应该可以看到jsp输出。
例子项目源代码下载(链接)。
参考链接:
Embedding an HTTP server in Equinox
Writing a bundle-based server application
OSGi based JSP Support
搬家前链接:https://www.cnblogs.com/bjzhanghao/archive/2007/10/28/940622.html
[Eclipse]实现内容助理(1. 自动完成)
在实际项目应用里,如果需要用户手动输入比较复杂的文本内容时可以考虑利用内容助理(Content Assistant)功能减轻用户负担,同时减低出错的机会。Jface的SourceViewer支持内容助理,这篇帖子里介绍一下如 何实现自动完成(Auto Completion)功能,即向用户提示接下来可能输入的内容。
//Create a new source viewer
sourceViewer = new SourceViewer(shell, null, SWT.BORDER | SWT.WRAP | SWT.V_SCROLL);

//Set a blank document
sourceViewer.setDocument(new Document(""));
sourceViewer.setEditable(true);

StyledText txtSource = sourceViewer.getTextWidget();
GridData gd = new GridData(GridData.FILL_BOTH);
txtSource.setLayoutData(gd);
自动完成功能一般在以下两种条件下弹出一个小窗口向用户提示当前可供选择的选项,一是用户按下指定的组合键时,二是用户输入了特定的字 符时,SourceViewer支持这两种触发方式。在程序里使用SourceViewer和使用一般控件没有很大的分别,只是SourceViewer 是StyledText的包装,所以一些操作要通过getTextWidget()完成,如下所示:
//Configure source viewer, add content assistant support
sourceViewer.configure(new SourceViewerConfiguration() {
    @Override
    public IContentAssistant getContentAssistant(ISourceViewer sourceViewer) {
        ContentAssistant assistant = new ContentAssistant();
        IContentAssistProcessor cap = new MyContentAssistProcessor();
        assistant.setContentAssistProcessor(cap, IDocument.DEFAULT_CONTENT_TYPE);
        assistant.setInformationControlCreator(getInformationControlCreator(sourceViewer));
        assistant.enableAutoActivation(true);
        return assistant;
    }
});
现在这个SourceViewer还不能弹出任何提示,因为我们还没有给它一个SourceViewerConfiguration,后者通过getContentAssistant()负责提供一个IContentAssistant的实现。下面的代码显示了如何为SourceViewer设置SourceViewerConfiguration,这个例子里不论当前文本框里是什么内容都弹出一样的提示选项,在实际应用里可以根据内容改变选项:
public ICompletionProposal[] computeCompletionProposals(ITextViewer viewer, int offset) {
    String content = viewer.getTextWidget().getText();

    try {

        //Demo options
        final String[] options = new String[] { "sum()", "count()", "sort()" };

        //Dynamically generate proposal
        ArrayList result = new ArrayList();
        for (int i = 0; i < options.length; i++) {
            CompletionProposal proposal = new CompletionProposal(options[i], offset, 0, options[i].length());
            result.add(proposal);
        }
        return (ICompletionProposal[]) result.toArray(new ICompletionProposal[result.size()]);
    } catch (Exception e) {
        e.printStackTrace();
    }
    return null;
}

public char[] getCompletionProposalAutoActivationCharacters() {
    return TRIGGER_TOKENS;
}
上面代码里,MyContentAssistProcessor是我们对IContentAssistant接口的实现,它里面与自动完成有关的是computeCompletionProposals()和getCompletionProposalAutoActivationCharacters()这两个方法,前者返回的结果数组将作为弹出提示窗口里的选项,后者返回的字符数组包含了可以触发弹出窗口的特殊字符。
最后,我们还要支持用户触发内容助理,这要求为SourceViewer添加一个监听器:
sourceViewer.appendVerifyKeyListener(new VerifyKeyListener() {
    public void verifyKey(VerifyEvent event) {
        // Check for Alt+/
        if (event.stateMask == SWT.ALT && event.character == '/') {
            // Check if source viewer is able to perform operation
            if (sourceViewer.canDoOperation(SourceViewer.CONTENTASSIST_PROPOSALS))
                // Perform operation
                sourceViewer.doOperation(SourceViewer.CONTENTASSIST_PROPOSALS);
            // Veto this key press to avoid further processing
            event.doit = false;
        }
    }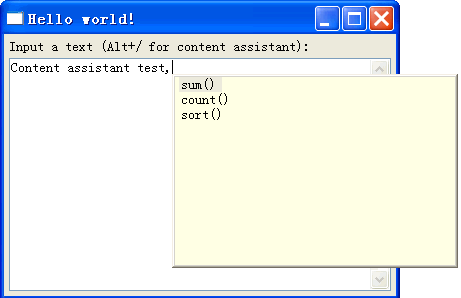
});实现后的结果截图如下图所示,(示例代码下载):
参考链接
为 SWT 应用程序配备内容助理
FAQ How do I add Content Assist to my language editor?
Eclipse Help - Content Assist
搬家前链接:https://www.cnblogs.com/bjzhanghao/archive/2007/09/28/908648.html
GMF里实现contributionItemProvider扩展点
GMF里的contributionItemProvider扩展点的功能与org.eclipse.ui.editorActions类似,即为指定editor增加Action,但用contributionItemProvider还可以为view添加Action,以及实现添加popupMenu等多种功能,相当于eclipse提供的多种与Action有关的扩展点的集合。现以为editor增加Action为例介绍一下如何使用contributionItemProvider。
首先当然是在plugin.xml里描述contributionItemProvider扩展点的实现方式。在下面的xml代码里,首先用contributionItemProvider元素指定了实现类为com.my.MyContributionItemProvider,这个实现类可以有两种情况:一般它继承自GMF提供的AbstractContributionItemProvider;也可以直接实现IContributionItemProvider,后者情况就不需要再定义contributionItemProvider元素下的其他元素了,全部Action都可以用java代码在contributeToActionBars()和contributeToPopupMenu()方法里构造。
<extension
       point="org.eclipse.gmf.runtime.common.ui.services.action.contributionItemProviders">
    <contributionItemProvider
          checkPluginLoaded="false"
          class="com.my.MyContributionItemProvider">
       <Priority name="Low"/>
       <partContribution id="com.my.RuleDiagramEditorID">
          <partAction
                id="showConsole"
                menubarPath="/window/views">
          </partAction>
       </partContribution>
    </contributionItemProvider>
 </extension>
现在讨论继承AbstractContributionItemProvider的情况,我们需要实现createAction()方法,这个方法接受actionId作为参数。actionId参数是在plugin.xml里指定的,如上面的xml片段里,首先用partContribution元素指定要把Action添加到哪个editor上,然后用partAction元素指定希望添加的Action的id和menubarpath位置等其他参数。
实际上AbstractContributionItemProvider的主要功能就是解析contributionItemProvider下的xml元素,并根据这些元素内容调用createAction()方法,所以在createAction()方法里我们可以得到actionId并根据它创建实际的Action类。下面是对应上面xml片段的MyContributionItemProvider代码:
public class MyContributionItemProvider extends AbstractContributionItemProvider {

    @Override
    protected IAction createAction(String actionId, IWorkbenchPartDescriptor partDescriptor) {
        if (actionId.equals("showConsole")) {
            IAction action =  new ShowViewAction("&Console", "console.view.id");
            action.setImageDescriptor();
            return action;
        }
        return super.createAction(actionId, partDescriptor);
    }

    class ShowViewAction extends Action{

    }
}
最后要注意一点,如果editor和contributionItemProvider不在同一个plugin里,则一定要在plugin.xml里指定contributionItemProvider元素的checkPluginLoaded属性为false,否则这个contributionItemProvider不会被加载。(补充08/01/02: 如果menuPath设置不正确也可能导致contributionItemProvider不被加载,一个正确的menuPath是"/file/print")
参考链接
http://dev.eclipse.org/newslists/news.eclipse.modeling.gmf/msg06035.html
http://dev.eclipse.org/newslists/news.eclipse.technology.gmf/msg04270.html
http://dev.eclipse.org/newslists/news.eclipse.modeling.gmf/msg00757.html
http://dev.eclipse.org/newslists/news.eclipse.modeling.gmf/msg08196.html
搬家前链接:https://www.cnblogs.com/bjzhanghao/archive/2007/09/17/896499.html
解决EMF里引用对象的刷新问题
假设在ecore模型里定义了两个类:产品(Product)和制造商(Manufacturer),Product通过名为manufacturer的多对一引用与Manufacturer建立关系。在应用程序里,有一些表格(TableViewer)需要在显示产品信息的同时,还要显示制造商相关信息,如制造商名称。缺省条件下,因为这些表格里每一行是一个Product实例,表格的文字更新由AdapterFactoryLabelProvider通过ProductItemProvider实现,所以在制造商名称被改变的时候产品表格无法得到更新。
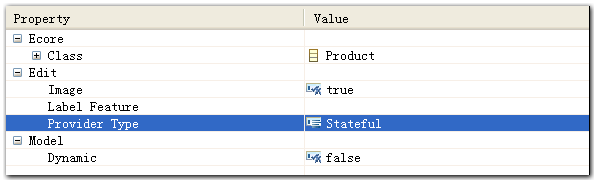
当然可以直接调用viewer.refresh()方法刷新表格,但这要求具有对viewer的引用,况且我们不知道以后还会有多少个这样的viewer需要刷新。更好的解决办法是修改ProductItemProvider,让它维护一个Adapter(即EMF里的模型监听器),并把这个监听器注册到Product对应的Manufacturer实例上。监听器的注册可以在getText()方法里实现(也许有更合适的地方),别忘了在dispose()方法里要删除这个监听器。此外,要在.genmodel里把Product的Provider Type属性值从缺省的Singleton改为Stateful,如下图,这样每个Product都对应一个ProductItemProvider实例,从而对应一个这样的监听器。
以下是ProductItemProvider里部分相关代码:
//Define an adapter
    protected Adapter manufacturerAdapter =
         new AdapterImpl()
         {
           public void notifyChanged(Notification notification)
           {
             //notify product viewers if manufacturer's name changed
             if (notification.getFeatureID(Manufacturer.class) == ProductPackage.MANUFACTURER__NAME)
               fireNotifyChanged(new ViewerNotification(notification, ProductItemProvider.this.getTarget(), false, true));
           }
         };

    public String getText(Object object) {
        Product product = (Product) object;

        //Add following codes to maintain the adapter
        Manufacturer manufacturer = product.getManufacturer();
        if (manufacturer != manufacturerAdapter.getTarget()) {
            if (manufacturerAdapter.getTarget() != null)
                manufacturerAdapter.getTarget().eAdapters().remove(manufacturerAdapter);
            if (manufacturer != null)
                manufacturer.eAdapters().add(manufacturerAdapter);
        }

        String label = var.getName();
        return label;
    }

  //Remove adapter when ProductItemProvider disposes
    public void dispose() {
        if (manufacturerAdapter.getTarget() != null)
            manufacturerAdapter.getTarget().eAdapters().remove(manufacturerAdapter);
        super.dispose();
    }
最后,需要覆盖ProductItemProvider的notifyChanged()方法,在switch里增加如下代码:
case ProductPackage.Product__Manufacturer:
    fireNotifyChanged(new ViewerNotification(notification, notification.getNotifier(), false, true));
    return;
参考链接
http://dev.eclipse.org/newslists/news.eclipse.tools.emf/msg18730.html
搬家前链接:https://www.cnblogs.com/bjzhanghao/archive/2007/09/03/880854.html
向GMF应用的Palette里添加工具
GMF能根据.gmftool里定义的工具项生成一个缺省的palette(在生成的XXXPaletteFactory类里实现,目前没有利用GMF扩展点),同时GMF Runtimeh还提供了org.eclipse.gmf.runtime.diagram.ui.paletteProviders扩展点,如果缺省palette里的工具项不能满足需要,利用这个扩展点可以添加我们需要的其他工具。下图是GMF的Logic例子里对这个扩展点的实现:

图:GMF的Logic例子利用paletteProviders扩展点添加工具项
实现paletteProviders扩展点的步骤并不复杂。首先是在plugin.xml里定义扩展点需要的信息,paletteProvider的class一般选org.eclipse.gmf.runtime.diagram.ui.providers.DefaultPaletteProvider即可,它会把下面定义的信息转换为实际的工具项添加到palette里。在paletteProvider下要创建一个editor项并指定id值;还要创建contribution项包含实际需要的工具项,contribution项里需要指定一个factoryClass,这个类要自己实现,并继承自PaletteFactory.Adapter,实现它的createTool()方法,这个方法根据此contribution项下面所定义的工具的id生成实际的工具实例。下面是GMF的Logic例子所使用的paletteFactory代码,可以看到所做的工作就是根据不同的toolId返回工具实例:
public class LogicPaletteFactory
    extends PaletteFactory.Adapter {

    /*
     *  Create the tool according to type
     */
    public Tool createTool(String toolId) {
        if (toolId.equals(LogicConstants.TOOL_LED)){
            return new CreationTool(LogicSemanticType.LED);
        }else if (toolId.equals(LogicConstants.TOOL_CIRCUIT)) {
            return new CreationTool(LogicSemanticType.CIRCUIT);
        }else if (toolId.equals(LogicConstants.TOOL_ORGATE)) {
            return new CreationTool(LogicSemanticType.ORGATE);
        }else if (toolId.equals(LogicConstants.TOOL_ANDGATE)) {
            return new CreationTool(LogicSemanticType.ANDGATE);
        }else if (toolId.equals(LogicConstants.TOOL_XORGATE)) {
            return new CreationTool(LogicSemanticType.XORGATE);
        }else if (toolId.equals(LogicConstants.TOOL_FLOWCONTAINER)) {
            return new CreationTool(LogicSemanticType.FLOWCONTAINER);

        }else if (toolId.equals(LogicConstants.TOOL_CONNECTION)) {
            return new ConnectionCreationTool(LogicSemanticType.WIRE);
        }
        return null;
    }
}
在contribution项下面可以创建多种类型的工具项(entry),例如Drawer、Separator,Stack和Tool等等,每一个工具项除Label外需要有一个id和一个path,id的作用如刚刚提到的是给paletteFactory的createTool()方法的参数,后者根据id创建所需要的工具实例;path可以是"/"或"/entryId/"这样用来指定工具项在palette里的位置。
总结下来就是,在plugin.xml里指定各个工具项的位置,而paletteFactory负责工具id到实际工具的转换。
参考资料
Creating and Registering the Palette Provider and Factory Classes
搬家前链接:https://www.cnblogs.com/bjzhanghao/archive/2007/08/13/854514.html