SWT里的GridLayoutFactory和GridDataFactory布局

我写的SWT程序里用到layout的地方大部分都是GridLayout,今天才发现原来从eclipse 3.2开始就有了这两个方便使的类:GridLayoutFactory和GridDataFactory。特别是GridDataFactory,以前要用至少三行的代码:

GridData gd = new GridData(GridData.FILL_HORIZONTAL);
gd.horizontalSpan = 2;
txtName.setLayoutData(gd);

现在用一行就可以了(稍微长点儿):

GridDataFactory.fillDefaults().grab(true, false).span(2, 1).applyTo(txtName);

或者有些情况下更简单:

GridDataFactory.generate(txtName, 2, 1);

顺便提一句:eclipse.org上关于SWT的例子在http://www.eclipse.org/swt/snippets就有很多,而JFace的例子则可以在这个地址(2015/10/20更新,JFace Snippets)找到(或者从cvs里下载)。

搬家前链接:https://www.cnblogs.com/bjzhanghao/archive/2008/12/09/1350938.html

[Eclipse]实现内容助理(1. 自动完成)

在实际项目应用里,如果需要用户手动输入比较复杂的文本内容时可以考虑利用内容助理(Content Assistant)功能减轻用户负担,同时减低出错的机会。Jface的SourceViewer支持内容助理,这篇帖子里介绍一下如 何实现自动完成(Auto Completion)功能,即向用户提示接下来可能输入的内容。

//Create a new source viewer
sourceViewer = new SourceViewer(shell, null, SWT.BORDER | SWT.WRAP | SWT.V_SCROLL);

//Set a blank document
sourceViewer.setDocument(new Document(""));
sourceViewer.setEditable(true);

StyledText txtSource = sourceViewer.getTextWidget();
GridData gd = new GridData(GridData.FILL_BOTH);
txtSource.setLayoutData(gd);

自动完成功能一般在以下两种条件下弹出一个小窗口向用户提示当前可供选择的选项,一是用户按下指定的组合键时,二是用户输入了特定的字 符时,SourceViewer支持这两种触发方式。在程序里使用SourceViewer和使用一般控件没有很大的分别,只是SourceViewer 是StyledText的包装,所以一些操作要通过getTextWidget()完成,如下所示:

//Configure source viewer, add content assistant support
sourceViewer.configure(new SourceViewerConfiguration() {
    @Override
    public IContentAssistant getContentAssistant(ISourceViewer sourceViewer) {
        ContentAssistant assistant = new ContentAssistant();
        IContentAssistProcessor cap = new MyContentAssistProcessor();
        assistant.setContentAssistProcessor(cap, IDocument.DEFAULT_CONTENT_TYPE);
        assistant.setInformationControlCreator(getInformationControlCreator(sourceViewer));
        assistant.enableAutoActivation(true);
        return assistant;
    }
});

现在这个SourceViewer还不能弹出任何提示,因为我们还没有给它一个SourceViewerConfiguration,后者通过getContentAssistant()负责提供一个IContentAssistant的实现。下面的代码显示了如何为SourceViewer设置SourceViewerConfiguration,这个例子里不论当前文本框里是什么内容都弹出一样的提示选项,在实际应用里可以根据内容改变选项:

public ICompletionProposal[] computeCompletionProposals(ITextViewer viewer, int offset) {
    String content = viewer.getTextWidget().getText();

    try {

        //Demo options
        final String[] options = new String[] { "sum()", "count()", "sort()" };

        //Dynamically generate proposal
        ArrayList result = new ArrayList();
        for (int i = 0; i < options.length; i++) {
            CompletionProposal proposal = new CompletionProposal(options[i], offset, 0, options[i].length());
            result.add(proposal);
        }
        return (ICompletionProposal[]) result.toArray(new ICompletionProposal[result.size()]);
    } catch (Exception e) {
        e.printStackTrace();
    }
    return null;
}

public char[] getCompletionProposalAutoActivationCharacters() {
    return TRIGGER_TOKENS;
}

上面代码里,MyContentAssistProcessor是我们对IContentAssistant接口的实现,它里面与自动完成有关的是computeCompletionProposals()和getCompletionProposalAutoActivationCharacters()这两个方法,前者返回的结果数组将作为弹出提示窗口里的选项,后者返回的字符数组包含了可以触发弹出窗口的特殊字符。

最后,我们还要支持用户触发内容助理,这要求为SourceViewer添加一个监听器:

sourceViewer.appendVerifyKeyListener(new VerifyKeyListener() {
    public void verifyKey(VerifyEvent event) {
        // Check for Alt+/
        if (event.stateMask == SWT.ALT && event.character == '/') {
            // Check if source viewer is able to perform operation
            if (sourceViewer.canDoOperation(SourceViewer.CONTENTASSIST_PROPOSALS))
                // Perform operation
                sourceViewer.doOperation(SourceViewer.CONTENTASSIST_PROPOSALS);
            // Veto this key press to avoid further processing
            event.doit = false;
        }
    }
});

实现后的结果截图如下图所示,(示例代码下载):

file

参考链接

为 SWT 应用程序配备内容助理
FAQ How do I add Content Assist to my language editor?
Eclipse Help - Content Assist

搬家前链接:https://www.cnblogs.com/bjzhanghao/archive/2007/09/28/908648.html

GMF里实现contributionItemProvider扩展点

GMF里的contributionItemProvider扩展点的功能与org.eclipse.ui.editorActions类似,即为指定editor增加Action,但用contributionItemProvider还可以为view添加Action,以及实现添加popupMenu等多种功能,相当于eclipse提供的多种与Action有关的扩展点的集合。现以为editor增加Action为例介绍一下如何使用contributionItemProvider。

首先当然是在plugin.xml里描述contributionItemProvider扩展点的实现方式。在下面的xml代码里,首先用contributionItemProvider元素指定了实现类为com.my.MyContributionItemProvider,这个实现类可以有两种情况:一般它继承自GMF提供的AbstractContributionItemProvider;也可以直接实现IContributionItemProvider,后者情况就不需要再定义contributionItemProvider元素下的其他元素了,全部Action都可以用java代码在contributeToActionBars()和contributeToPopupMenu()方法里构造。

<extension
       point="org.eclipse.gmf.runtime.common.ui.services.action.contributionItemProviders">
    <contributionItemProvider
          checkPluginLoaded="false"
          class="com.my.MyContributionItemProvider">
       <Priority name="Low"/>
       <partContribution id="com.my.RuleDiagramEditorID">
          <partAction
                id="showConsole"
                menubarPath="/window/views">
          </partAction>
       </partContribution>
    </contributionItemProvider>
 </extension>

现在讨论继承AbstractContributionItemProvider的情况,我们需要实现createAction()方法,这个方法接受actionId作为参数。actionId参数是在plugin.xml里指定的,如上面的xml片段里,首先用partContribution元素指定要把Action添加到哪个editor上,然后用partAction元素指定希望添加的Action的id和menubarpath位置等其他参数。

实际上AbstractContributionItemProvider的主要功能就是解析contributionItemProvider下的xml元素,并根据这些元素内容调用createAction()方法,所以在createAction()方法里我们可以得到actionId并根据它创建实际的Action类。下面是对应上面xml片段的MyContributionItemProvider代码:

public class MyContributionItemProvider extends AbstractContributionItemProvider {

    @Override
    protected IAction createAction(String actionId, IWorkbenchPartDescriptor partDescriptor) {
        if (actionId.equals("showConsole")) {
            IAction action =  new ShowViewAction("&Console", "console.view.id");
            action.setImageDescriptor();
            return action;
        }
        return super.createAction(actionId, partDescriptor);
    }

    class ShowViewAction extends Action{

    }
}

最后要注意一点,如果editor和contributionItemProvider不在同一个plugin里,则一定要在plugin.xml里指定contributionItemProvider元素的checkPluginLoaded属性为false,否则这个contributionItemProvider不会被加载。(补充08/01/02: 如果menuPath设置不正确也可能导致contributionItemProvider不被加载,一个正确的menuPath是"/file/print")

参考链接

http://dev.eclipse.org/newslists/news.eclipse.modeling.gmf/msg06035.html
http://dev.eclipse.org/newslists/news.eclipse.technology.gmf/msg04270.html
http://dev.eclipse.org/newslists/news.eclipse.modeling.gmf/msg00757.html
http://dev.eclipse.org/newslists/news.eclipse.modeling.gmf/msg08196.html

搬家前链接:https://www.cnblogs.com/bjzhanghao/archive/2007/09/17/896499.html

解决EMF里引用对象的刷新问题

假设在ecore模型里定义了两个类:产品(Product)和制造商(Manufacturer),Product通过名为manufacturer的多对一引用与Manufacturer建立关系。在应用程序里,有一些表格(TableViewer)需要在显示产品信息的同时,还要显示制造商相关信息,如制造商名称。缺省条件下,因为这些表格里每一行是一个Product实例,表格的文字更新由AdapterFactoryLabelProvider通过ProductItemProvider实现,所以在制造商名称被改变的时候产品表格无法得到更新。

当然可以直接调用viewer.refresh()方法刷新表格,但这要求具有对viewer的引用,况且我们不知道以后还会有多少个这样的viewer需要刷新。更好的解决办法是修改ProductItemProvider,让它维护一个Adapter(即EMF里的模型监听器),并把这个监听器注册到Product对应的Manufacturer实例上。监听器的注册可以在getText()方法里实现(也许有更合适的地方),别忘了在dispose()方法里要删除这个监听器。此外,要在.genmodel里把Product的Provider Type属性值从缺省的Singleton改为Stateful,如下图,这样每个Product都对应一个ProductItemProvider实例,从而对应一个这样的监听器。

file

以下是ProductItemProvider里部分相关代码:

//Define an adapter
    protected Adapter manufacturerAdapter =
         new AdapterImpl()
         {
           public void notifyChanged(Notification notification)
           {
             //notify product viewers if manufacturer's name changed
             if (notification.getFeatureID(Manufacturer.class) == ProductPackage.MANUFACTURER__NAME)
               fireNotifyChanged(new ViewerNotification(notification, ProductItemProvider.this.getTarget(), false, true));
           }
         };

    public String getText(Object object) {
        Product product = (Product) object;

        //Add following codes to maintain the adapter
        Manufacturer manufacturer = product.getManufacturer();
        if (manufacturer != manufacturerAdapter.getTarget()) {
            if (manufacturerAdapter.getTarget() != null)
                manufacturerAdapter.getTarget().eAdapters().remove(manufacturerAdapter);
            if (manufacturer != null)
                manufacturer.eAdapters().add(manufacturerAdapter);
        }

        String label = var.getName();
        return label;
    }

  //Remove adapter when ProductItemProvider disposes
    public void dispose() {
        if (manufacturerAdapter.getTarget() != null)
            manufacturerAdapter.getTarget().eAdapters().remove(manufacturerAdapter);
        super.dispose();
    } 

最后,需要覆盖ProductItemProvider的notifyChanged()方法,在switch里增加如下代码:

case ProductPackage.Product__Manufacturer:
    fireNotifyChanged(new ViewerNotification(notification, notification.getNotifier(), false, true));
    return;

参考链接

http://dev.eclipse.org/newslists/news.eclipse.tools.emf/msg18730.html

搬家前链接:https://www.cnblogs.com/bjzhanghao/archive/2007/09/03/880854.html

向GMF应用的Palette里添加工具

GMF能根据.gmftool里定义的工具项生成一个缺省的palette(在生成的XXXPaletteFactory类里实现,目前没有利用GMF扩展点),同时GMF Runtimeh还提供了org.eclipse.gmf.runtime.diagram.ui.paletteProviders扩展点,如果缺省palette里的工具项不能满足需要,利用这个扩展点可以添加我们需要的其他工具。下图是GMF的Logic例子里对这个扩展点的实现:

file
图:GMF的Logic例子利用paletteProviders扩展点添加工具项

实现paletteProviders扩展点的步骤并不复杂。首先是在plugin.xml里定义扩展点需要的信息,paletteProvider的class一般选org.eclipse.gmf.runtime.diagram.ui.providers.DefaultPaletteProvider即可,它会把下面定义的信息转换为实际的工具项添加到palette里。在paletteProvider下要创建一个editor项并指定id值;还要创建contribution项包含实际需要的工具项,contribution项里需要指定一个factoryClass,这个类要自己实现,并继承自PaletteFactory.Adapter,实现它的createTool()方法,这个方法根据此contribution项下面所定义的工具的id生成实际的工具实例。下面是GMF的Logic例子所使用的paletteFactory代码,可以看到所做的工作就是根据不同的toolId返回工具实例:

public class LogicPaletteFactory
    extends PaletteFactory.Adapter {

    /*
     *  Create the tool according to type       
     */
    public Tool createTool(String toolId) {
        if (toolId.equals(LogicConstants.TOOL_LED)){
            return new CreationTool(LogicSemanticType.LED);
        }else if (toolId.equals(LogicConstants.TOOL_CIRCUIT)) {
            return new CreationTool(LogicSemanticType.CIRCUIT);
        }else if (toolId.equals(LogicConstants.TOOL_ORGATE)) {
            return new CreationTool(LogicSemanticType.ORGATE);
        }else if (toolId.equals(LogicConstants.TOOL_ANDGATE)) {
            return new CreationTool(LogicSemanticType.ANDGATE);
        }else if (toolId.equals(LogicConstants.TOOL_XORGATE)) {
            return new CreationTool(LogicSemanticType.XORGATE);
        }else if (toolId.equals(LogicConstants.TOOL_FLOWCONTAINER)) {
            return new CreationTool(LogicSemanticType.FLOWCONTAINER);

        }else if (toolId.equals(LogicConstants.TOOL_CONNECTION)) {
            return new ConnectionCreationTool(LogicSemanticType.WIRE);
        }
        return null;
    }
}

在contribution项下面可以创建多种类型的工具项(entry),例如Drawer、Separator,Stack和Tool等等,每一个工具项除Label外需要有一个id和一个path,id的作用如刚刚提到的是给paletteFactory的createTool()方法的参数,后者根据id创建所需要的工具实例;path可以是"/"或"/entryId/"这样用来指定工具项在palette里的位置。

总结下来就是,在plugin.xml里指定各个工具项的位置,而paletteFactory负责工具id到实际工具的转换。

参考资料

Creating and Registering the Palette Provider and Factory Classes

搬家前链接:https://www.cnblogs.com/bjzhanghao/archive/2007/08/13/854514.html

SWT的SelectionEvent.stateMask不起作用问题

通常理解stateMask的作用是标志事件发生时是否有Shift、Ctrl等键同时按下,但SWT里绝大多数Control都不支持这个标志,无论按下什么键,事件对象里的stateMask都是0(不信可以运行下面的代码)。更奇怪的是这个问题已经被提出3年多还没有解决,stateMask只对MenuItem有用,那要怎么实现对Button的Ctrl+Click检测呢?

import org.eclipse.swt.SWT; import org.eclipse.swt.events.SelectionAdapter; import org.eclipse.swt.events.SelectionEvent; import org.eclipse.swt.layout.GridLayout; import org.eclipse.swt.widgets.Button; import org.eclipse.swt.widgets.Display; import org.eclipse.swt.widgets.Shell; public class ButtonTest { public static void main(String[] args) {
  Display display = new Display();
  Shell shell = new Shell(display);
  shell.setLayout(new GridLayout());
  shell.setSize(200, 200); final Button button = new Button(shell, SWT.NONE);
  button.addSelectionListener(new SelectionAdapter() { public void widgetSelected(SelectionEvent e) {
    System.out.println(e.stateMask);//Always zero
 }
  });
  button.setText("Test");

  shell.open(); while (!shell.isDisposed()) { if (!display.readAndDispatch())
    display.sleep();
  }
  display.dispose();
 }
}

搬家前链接:https://www.cnblogs.com/bjzhanghao/archive/2007/08/28/873677.html

Eclipse 3.3里新TreeViewer给EMF应用程序带来的一个问题

以前在Eclipse 3.2里做的一个EMF应用程序,到3.3里发现一些TreeViewer里标签显示的格式不对,例如原来显示“Condition true”的,在3.3下可能显示“1”。调试了一下发现这些TreeViewer在为每个节点获得标签时,若相应的XXXItemProvider实现了ITableItemLableProvider(即应用程序里有TableViewer也用到这个XXXItemProvider)时,会调用getColumnText()而不是getText()来得到文本内容。

在Eclipse新闻组里搜到这个帖子讲的是同一件事(新闻组是遇到问题后第一反应),原因不在EMF,是Eclipse 3.3里对TreeViewer的实现有了变化,新的实现把原来的TreeViewer当成只有一列的特殊的TableViewer来对待,以致EMF也把TreeViewer当成了TableViewer,当然会去找getColumnText()了。解决的办法也不复杂,新闻组里那个帖子也提到了,我给帖到这方便大家参考吧。

/**
 * @Added
 * Solve a problem raised in jface 3.3 tree viewer
 * @see http://dev.eclipse.org/newslists/news.eclipse.tools.emf/msg25409.html
 *
 */
class WorkaroundAdapterFactoryLabelProvider extends AdapterFactoryLabelProvider {
    /**
    * @param adapterFactory
    */
    public WorkaroundAdapterFactoryLabelProvider(AdapterFactory adapterFactory) {
        super(adapterFactory);
    }

    @Override
    public Image getColumnImage(Object object, int columnIndex) {
        return super.getImage(object);
    }

    @Override
    public String getColumnText(Object object, int columnIndex) {
        return super.getText(object);
    }
}

有了上面这个类,然后把原来setLabelProvider()里的AdapterFactoryLabelProvider换成它就可以了。EMF以后的版本应该会解决这个问题。

搬家前链接:https://www.cnblogs.com/bjzhanghao/archive/2007/08/21/864579.html

GEF常见问题8:导出到图片

利用org.eclipse.draw2d.SWTGraphics类和org.eclipse.swt.graphics.ImageLoader类可以实现把画布导出到图片文件的功能,原理是在内存里创建一个空白的Image,然后把Diagram画到它上面,最后保存到指定文件和格式。

我们可以把导出工作分为两部分,第一部分负责提供要导出的IFigure实例(若要导出整个画布,应从GraphicalViewer获得PRINTABLE_LAYERS,否则会丢失画布上的连线),并负责将得到的图片数据写入文件;第二部分负责IFigure实例到图片数据的转换过程。以下是前者的示例代码:

String filename = ...;
PracticeEditor editor = ...;
ScalableFreeformRootEditPart rootPart = ...;
IFigure figure = rootPart.getLayer(ScalableFreeformRootEditPart.PRINTABLE_LAYERS);//To ensure every graphical element is included
byte[] data = createImage(figure, SWT.IMAGE_PNG);
try {
    FileOutputStream fos = new FileOutputStream(filename);
    fos.write(data);
    fos.close();
} catch (IOException e) {
    e.printStackTrace();
}

上面代码里调用的createImage()方法是实际在内存里作画并转换为可写入为文件的二进制流的地方,代码如下所示:

private byte[] createImage(IFigure figure, int format) {
    Rectangle r = figure.getBounds();
    ByteArrayOutputStream result = new ByteArrayOutputStream();
    Image image = null;
    GC gc = null;
    Graphics g = null;
    try {
        image = new Image(null, r.width, r.height);
        gc = new GC(image);
        g = new SWTGraphics(gc);
        g.translate(r.x * -1, r.y * -1);
        figure.paint(g);
        ImageLoader imageLoader = new ImageLoader();
        imageLoader.data = new ImageData[] { image.getImageData() };
        imageLoader.save(result, format);
    } finally {
        if (g != null) {
            g.dispose();
        }
        if (gc != null) {
            gc.dispose();
        }
        if (image != null) {
            image.dispose();
        }
    }
    return result.toByteArray();
}

点此下载工程,此工程修改自GEF应用实例中的GefPractice,目标文件的扩展名为.gefpractice不变。

file
图1 运行后增加了导出功能按钮

参考资料

GEF新闻组里相关链接:
http://dev.eclipse.org/newslists/news.eclipse.tools.gef/msg05012.html
http://dev.eclipse.org/newslists/news.eclipse.tools.gef/msg06329.html

搬家前链接:https://www.cnblogs.com/bjzhanghao/archive/2007/08/01/838278.html

继承PageBookView实现自己的“属性视图”

很多Eclipse应用程序在提供一个Editor的同时还提供一些View,这些View监视Editor的Selection,提供一些上下文相关的信息。Eclipse自带的PropertySheet(属性视图)就是这样一个例子,Outline(大纲视图)也是如此,从功能上看,不妨把这类用途的视图称为“广义的属性视图”。

以前我都是直接继承ViewPart来实现自己的属性视图的,但我发现要花不少功夫在处理View与Editor的协调上。例如当Editor被关闭时,View里的信息也应该隐藏,切换Editor时也需要进行处理,等等。最近看一个项目的代码时发现他们是继承org.eclipse.ui.part.PageBookView来实现同样功能的,就像PropertySheet所做的一样,效果很不错,而且需要自己写的代码量不是很多,因为PageBookView里已经帮助处理了以上提到的大部分功能。因此这里介绍一下使用PageBookView的方法供大家参考。

顾名思义,PageBookView是这样一种View,它就像一本书,里面可以容纳多个Page,但同一时间只给用户显示一个Page。PageBookView负责根据当前活动的WorkbenchPart切换到合适的Page,实际显示的内容主要由Page提供,这些Page一般是通过WorkbenchPart的getAdapter()方法提供的。

继承PageBookView实现自己的属性视图时,PageBookView子类的实现几乎是固定的,如果你的View与WorkbenchPart里的Selection有关(上下文敏感),则继承PageBookView的时候应顺便实现ISelectionListener,然后在init()方法里注册自己为WorkbenchPage的选择监听器,并在selectionChanged()方法里把事件转发给当前显示的Page,下面的代码是一个典型的上下文敏感的PageBookView子类:

import org.eclipse.jface.viewers.ISelection;
import org.eclipse.swt.widgets.Composite;
import org.eclipse.ui.IEditorPart;
import org.eclipse.ui.ISelectionListener;
import org.eclipse.ui.IViewSite;
import org.eclipse.ui.IWorkbenchPage;
import org.eclipse.ui.IWorkbenchPart;
import org.eclipse.ui.PartInitException;
import org.eclipse.ui.part.IPage;
import org.eclipse.ui.part.IPageBookViewPage;
import org.eclipse.ui.part.MessagePage;
import org.eclipse.ui.part.PageBook;
import org.eclipse.ui.part.PageBookView;

public class ExampleView extends PageBookView implements ISelectionListener{

    public ExampleView() {
    }

    @Override
    protected IPage createDefaultPage(PageBook book) {
        MessagePage page = new MessagePage();
        initPage(page);
        page.createControl(book);
        page.setMessage("An example view is not available.");
        return page;
    }

    @Override
    public void init(IViewSite site) throws PartInitException {
        super.init(site);
        site.getPage().addSelectionListener(this);
    }

    @Override
    public void dispose() {
        getSite().getPage().removeSelectionListener(this);
        super.dispose();
    }

    @Override
    protected PageRec doCreatePage(IWorkbenchPart part) {
        // Try to get a custom page
        Object obj = part.getAdapter(IExamplePage.class);
        if (obj instanceof IExamplePage) {
            IExamplePage page = (IExamplePage)obj;
            if (page instanceof IPageBookViewPage) 
                initPage((IPageBookViewPage)page);
            page.createControl(getPageBook());
            return new PageRec(part, page);
        }
        // Use the default page
        return null;
    }

    @Override
    protected void doDestroyPage(IWorkbenchPart part, PageRec pageRecord) {
        IExamplePage page = (IExamplePage) pageRecord.page;
        page.dispose();
        pageRecord.dispose();
    }

    @Override
    protected IWorkbenchPart getBootstrapPart() {
        IWorkbenchPage page = getSite().getPage();
        if (page != null)
            return page.getActiveEditor();
        else
            return null;
    }

    @Override
    protected boolean isImportant(IWorkbenchPart part) {
        return (part instanceof IEditorPart);
    }

    @Override
    public void createPartControl(Composite parent) {
        super.createPartControl(parent);
    }

    public void selectionChanged(IWorkbenchPart part, ISelection selection) {
        // we ignore our own selection or null selection
        if (part == this || selection == null) {
            return;
        }

        // pass the selection to the page
        if (!(getCurrentPage() instanceof IExamplePage))
            return;
        IExamplePage page = (IExamplePage) getCurrentPage();
        if (page != null) {
            page.selectionChanged(part, selection);
        }
    }
}

在上面这个View里,createDefaultPage()方法创建的Page是当活动WorkbenchPart不是我们所关心类型时所显示的信息,由MessagePage实现;isImportant()规定了这个View对什么样的WorkbenchPart感兴趣,在上面的例子里是只处理IEditorPart,作为对照,Eclipse的PropertySheet对所有类型的WorkbenchPart都有兴趣,除了它自己;如果活动WorkbenchPart是"Important"的,并且通过它的getAdapter()方法能得到我们需要的Page,则这个Page会显示在这个View里,否则还将显示缺省的MessagePage。

现在来看一下怎样实现自己的Page。一般要先定义一个继承自IPage的接口,它的一个作用是给WorkbenchPart#getAdapter()方法作为参数以标识我们需要的Page类型,如果前面PageBookView子类已经实现了ISelectionListener则它多半也要实现此接口,如下所示:

import org.eclipse.ui.ISelectionListener;
import org.eclipse.ui.part.IPage;

public interface IExamplePage extends IPage, ISelectionListener{

}

然后是具体的Page类,这个类其实和以前我们实现ViewPart的代码很相似,它继承自org.eclipse.ui.part.Page并实现刚才定义的接口,最重要的当然就是createControl()方法,如果需要还有selectionChanged()方法:

import org.eclipse.swt.SWT;
import org.eclipse.swt.widgets.Composite;
import org.eclipse.swt.widgets.Control;
import org.eclipse.ui.part.Page;

/**
 * @author zhanghao
 *
 */
public class ExamplePage extends Page implements IExamplePage {

    Text txtName;

    public ExamplePage() {
        super();
    }

    @Override
    public void createControl(Composite parent) {
        //Create your autual view UI here
        txtName = new Text(parent, SWT.BORDER);
    }

    @Override
    public Control getControl() {
        return txtName;
    }

    @Override
    public void setFocus() {

    }

    public void selectionChanged(IWorkbenchPart part, ISelection selection) {
        String name = ; //Get information from selection
        txtName.setText(name);
    }
}

补充一点,每个Page具有独立的ActionBar,也就是说要为PageBookView添加菜单或工具条项应该在Page里完成,一般实现在init()方法里。

现在还差一个步骤没做,那就是要在WorkbenchPart的getAdapter()方法里对这个View做出反应(这要求WorkbenchPart可访问自定义的Page类),典型情况下我们用自己的Page接口作为参数,代码类似下面这样:

public Object getAdapter(Class type) {
    if (type == IExamplePage.class) {
        return new ExamplePage();
    }
    return super.getAdapter(type);
}

当然,和以前一样还是要在plugin.xml里注册这个View,以便使用者能够在Eclipse里通过Window->Show View菜单命令把它显示出来。

最后,和PropertySheet相比,这样的实现还有一个小缺陷,那就是第一次打开这个View的时候不能显示Editor里当前选择的信息,大家不妨试着解决这个问题。(提示:参考PropertySheet的partActivated()方法)

搬家前链接:https://www.cnblogs.com/bjzhanghao/archive/2007/07/23/828850.html

[Eclipse]GEF入门系列(十二、自定义Request)

先简单回顾一下Request在GEF里的作用。Request是GEF里一个比较重要的角色,Tool将原始的鼠标事件转换为EditPart可以识别的请求,Request则承载了这些请求信息。举例来说,用户在调色板(Palette)里选择了创建节点工具(CreationTool),然后在画布区域按下鼠标左键,这时产生在画布上的鼠标单击事件将被CreationTool转换为一个CreateRequest,它里面包含了要创建的对象,坐标位置等信息。 EditPart上如果安装了能够处理CreateRequest的EditPolicy,则相应的EditPolicy会根据这个 CreateRequest创建一个Command,由后者实际执行创建新对象的必要操作。

GEF已经为我们提供了很多种类的Request,其中最常用的是CreateRequest及其子类 CreateConnectionRequest,其他比较常见的还有SelectionRequest,ChangeBoundsRequest和 ReconnectRequest等等。要实现一个典型的图形化应用程序,例如UML类图编辑器,这些预定义的Request基本够用了。然而各种稀奇古怪的需求我相信大家也见过不少,很多需求不太符合约定俗成的使用习惯,因此实现起来更多依赖开发人员的编码,而不是开发框架带来的便利。在这种时候,我们唯一的期望就是开发框架提供足够的扩展机制,以便让我们额外编写的代码能和其他代码和平共处,幸好GEF是具有足够的扩展性的。

再回到Request的问题上,为了说明什么情况下需要自定义Request,我在前文“应用实例”里的示例应用基础上假设一个新的需求:

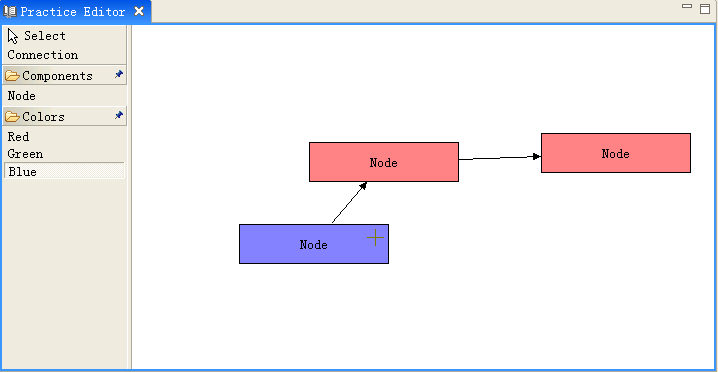
在Palette里增加三个工具,作用分别是把选中节点的背景颜色改变为红色、绿色和蓝色。

假如你用过Photoshop或类似软件,这个需求很像给节点上色的“油漆桶”或“上色工具”,当然在用户界面的背后,实际应用里这些颜色可能代表一个节点的重要程度,优先级或是异常信息等等。现在,让我们通过创建一个自定义的Request来实现这个需求,还是以前文中的示例项目为基础。

一、首先,原来的模型里节点(Node)类里没有反映颜色的成员变量,所以先要在Node类里添加一个color属性,以及相应的 getter/setter方法,注意这个setter方法里要和其他成员变量的setter方法一样传递模型改变的消息。仿照其他成员变量,还应该有一个静态字符串变量,用来区分消息对应哪个属性。

final public static String PROP_COLOR = "COLOR";

protected RGB color = new RGB(255, 255, 255);

public RGB getColor() {
    return color;
}

public void setColor(RGB color) {
    if (this.color.equals(color)) {
        return;
    }
    this.color = color;
    firePropertyChange(PROP_COLOR, null, color);
}

二、然后,要让Node的color属性变化能够反映到图形上,因此要修改NodePart里的propertyChanged()和 refreshVisuals()方法,在前者里增加对color属性的响应,在后者里将NodeFigure的背景颜色设置为Node的color属性对应的颜色。(注意,Color对象是系统资源对象,实际使用里需要缓存以避免系统资源耗尽,为节约篇幅起见,示例代码直接new Color()了)

public void propertyChange(PropertyChangeEvent evt) {

    if (evt.getPropertyName().equals(Node.PROP_COLOR))//Response to color change
        refreshVisuals();
}

protected void refreshVisuals() {

    ((NodeFigure) this.getFigure()).setBackgroundColor(new Color(null, node.getColor()));//TODO cache color instances
}

三、现在来创建我们自己的Request,因为目的是改变颜色,所以不妨叫做ChangeColorRequest。它应当继承自org.eclipse.gef.Request,我们需要ChangeColorRequest上带有两样信息:1.需要改变颜色的节点;2.目标颜色。因此它应该有这两个成员变量。

import org.eclipse.gef.Request;
import org.eclipse.swt.graphics.RGB;
import com.example.model.Node;

public class ChangeColorRequest extends Request{
    final static public String REQ_CHANGE_COLOR="REQ_CHANGE_COLOR";
    private Node node;
    private RGB color;

    public ChangeColorRequest(Node node, RGB color) {
        super();
        this.color = color;
        this.node = node;
        setType(REQ_CHANGE_COLOR);
    }

    public RGB getColor() {
        return color;
    }

    public Node getNode() {
        return node;
    }

    public void setNode(Node node) {
        this.node = node;
    }

    public void setColor(RGB color) {
        this.color = color;
    }

}

ChangeColorRequest看起来和一个JavaBean差不多,的确如此,因为Request的作用就是传递翻译后的鼠标事件。如果你看一下org.eclipse.gef.Request的代码,你会发现Request还有一个type属性,这个属性一般是一个字符串(在gef的RequestConstants里预定义了一些,如RequestConstants.REQ_SELECTION_HOVER),EditPolicy可以根据它决定是否处理这个Request。在我们的例子里,顺便定义了这样一个常量字符串REQ_CHANGE_COLOR,在后面的 ChangeColorEditPolicy里会用到它。

四、现在有一个问题,这个Request的实例应该在哪里生成?答案是在Tool里,用户在画布区域按下鼠标左键时,当前 Palette里被选中的Tool负责创建一个Request。我们现在面对的这个需求需要我们创建一种新的Tool:ChangeColorTool。我们让ChangeColorTool继承org.eclipse.gef.tools.SelectionTool,因为“上色工具”的用法和“选择工具”基本上差不多。显然,我们需要覆盖的是handleButtonDown()方法,用来告诉gef如果用户当前选择了这个工具,在画布区域按下鼠标会发生什么事情。代码如下:

import org.eclipse.gef.EditPart;
import org.eclipse.gef.commands.Command;
import org.eclipse.gef.tools.SelectionTool;
import org.eclipse.swt.graphics.RGB;
import com.example.model.Node;
import com.example.parts.NodePart;

public class ChangeColorTool extends SelectionTool {
    private RGB color;

    public ChangeColorTool(RGB color) {
        super();
        this.color = color;
    }

    /**
     * If target editpart is an {@link NodePart}, create a {@link ChangeColorRequest} instance, 
     * get command from target editpart with this request and execute.
     */
    @Override
    protected boolean handleButtonDown(int button) {
        //Get selected editpart
        EditPart editPart = this.getTargetEditPart();

        if (editPart instanceof NodePart) {
            NodePart nodePart = (NodePart) editPart;
            Node node = (Node) nodePart.getModel();

            //Create an instance of ChangeColorRequest
            ChangeColorRequest request = new ChangeColorRequest(node, color);

            //Get command from the editpart
            Command command = editPart.getCommand(request);

            //Execute the command
            this.getDomain().getCommandStack().execute(command);

            return true;
        }
        return false;
    }

}

五、有了Tool,还需要用ToolEntry把它包装起来添加到Palette里。所以我们创建一个名为 ChangeColorToolEntry并继承org.eclipse.gef.palette.ToolEntry的类,覆盖createTool()方法,让它返回我们的ChangeColorTool实例。这个ChangeColorToolEntry代码应该很容易理解:

import org.eclipse.gef.SharedCursors;
import org.eclipse.gef.Tool;
import org.eclipse.gef.palette.ToolEntry;
import org.eclipse.jface.resource.ImageDescriptor;
import org.eclipse.swt.graphics.RGB;

public class ChangeColorToolEntry extends ToolEntry {
    private RGB color;

    public ChangeColorToolEntry(RGB color, String label, String shortDesc, ImageDescriptor iconSmall,
            ImageDescriptor iconLarge) {
        super(label, shortDesc, iconSmall, iconLarge);
        this.color = color;
    }

    @Override
    public Tool createTool() {
        ChangeColorTool tool = new ChangeColorTool(color);
        tool.setUnloadWhenFinished(false);//Switch to selection tool after performed?
        tool.setDefaultCursor(SharedCursors.CROSS);//Any cursor you like
        return tool;
    }

}

六、要把三个这样的ToolEntry添加到Palette里,当然是通过修改原来的PaletteFactory类。为节约篇幅,这里就不帖它的代码了,可以下载并参考示例代码PaletteFactory.java里的createCategories()createColorDrawer()方法。

到目前为止,ChangeColorRequest已经可以发出了,接下来要解决的问题是如何让EditPart处理这个请求。

七、我们知道,GEF里任何对模型的修改都是通过command完成的,因此定义一个ChangeColorCommand肯定是需要的。它的execute()方法和undo()方法如下所示:

public class ChangeColorCommand extends Command{

    private RGB oldColor;

    @Override
    public void execute() {
        oldColor = node.getColor();
        node.setColor(color);
    }

    @Override
    public void undo() {
        node.setColor(oldColor);
    }
}

八、EditPolicy负责接收所有的Request,所以还要创建一个ChangeColorEditPolicy。在下面列出的代码里,你会看到我们定义了一个新的Role字符串,过一会儿我们在EditPart上安装这个EditPolicy的时候要以这个字符串作为Key,以避免覆盖EditPart上已有的其他EditPolicy。

import org.eclipse.gef.Request;
import org.eclipse.gef.commands.Command;
import org.eclipse.gef.editpolicies.AbstractEditPolicy;
import org.eclipse.swt.graphics.RGB;

import com.example.model.Node;

public class ChangeColorEditPolicy extends AbstractEditPolicy {
    final static public String CHANGE_COLOR_ROLE = "CHANGE_COLOR_ROLE";

    @Override
    public Command getCommand(Request request) {
        //Judge whether this request is intersting by its type
        if (request.getType() == ChangeColorRequest.REQ_CHANGE_COLOR) {
            ChangeColorRequest theRequest = (ChangeColorRequest) request;

            //Get information from request
            Node node = theRequest.getNode();
            RGB color = theRequest.getColor();

            //Create corresponding command and return it
            ChangeColorCommand command = new ChangeColorCommand(node, color);
            return command;
        }
        return null;
    }
}

九、最后还是回到EditPart,前面在第二个步骤里我们曾经修改过的NodePart里还有最后一处需要添加,那就是在installEditPolicies()方法里添加刚刚创建的ChangeColorEditPolicy:

protected void createEditPolicies() {

    //Add change color editpolicy
    installEditPolicy(ChangeColorEditPolicy.CHANGE_COLOR_ROLE, new ChangeColorEditPolicy());
}

现在我们已经完成了所有必要的修改,来看一下运行结果。

file

总结一下,需要创建的类有:ChangeColorRequest, ChangeColorTool, ChangeColorToolEntry, ChangeColorCommand, ChangeColorEditPolicy;需要修改的类有:Node, NodePart, PaletteFactory。在实例项目里,为了方便大家浏览,所有新创建的类都放在com.example.request包里,实际项目里还是建议分别放在对应的包里。

下载示例代码(在eclipse3.2.1和gef3.2下编译通过)

搬家前链接:https://www.cnblogs.com/bjzhanghao/archive/2007/06/21/792446.html